Snow Gardening

Is this the last blast of winter?  Maybe….it seems like it’s all coming at once.  But I do remember that in 2010 we had a freeze in April.

Caution is the watch word for early spring gardening in North Texas.  Be flexible, and be ready  to haul out the covers for plants that were just placed in the ground. snow garden

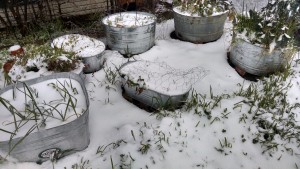
Looking at my garden tubs, I’m thankful I didn’t have enough time to plant collards, radishes and more lettuce just yet.

The garlic is also weathering the snow well. They’re in the square tub.  I’ll check to see how the bulbs are forming when the snow melts.

But look at the chard in the picture below (well, it’s hard to tell because it’s under all that snow!)…it’ll come back strong when it warms up a bit.  Chard is durable and I’ve found it’s a perennial – hardy perennial.  The downside, is that as it gets older and harvesting takes the outer leaves, the inner ones become smaller and smaller.  But they are tender and tasty!  Note that the green onions (those wisps at the front) are doing well, too.snow chard


The chickens are well suited for the cold – they have feathers and down, and I’ve tarped the north and most of the west side of the run so that no snow gets into their habitat.  I just keep them busy with scratch and some cracked corn (extra carbohydrate to help them keep warm).

snow chickens

Next week will warm a bit.  I’ll write more about what I’m planting next week – and if you’re in the Dallas Design District, stop by for my Straw Bale Gardening class at Trinity Haymarket (March 7, 10 am – free).

Until then, stay warm.

Gardening with Children and School Gardens

Gardening with children can be so rewarding.  Not only can it be a time for quality interaction, but it can serve as a stepping stone to learning about a plant’s needs, bugs, weeds and patience.

For instance, all plants need soil, water, nutrients (these are plant vitamins – like compost, worm poop, fertilizer), sun and temperature (cold season vs. warm season).  Then there are the bugs – the bad ones that eat the plants or damage them, and the good ones that pollinate the plants or eat the bad bugs.

In addition, the child learns what weeds are and why they take food away from the plant and must be removed.  But not all “weeds” are bad – some, like dandelions, have deep roots and help bring nutrients from deep in the soil up so the other plants can use them.   Weeds are just plants that are in the wrong place.

In gardening, a child learns patience.  My father once said, “You can hurry people, but you can’t hurry a plant.”  And that is so true!  There are some ways to speed things up a bit, but a seed is not going to sprout and grow to fruiting maturity in a week.  Besides, it’s exciting to go out each day and see what how the plants have grown, and to watch as a tomato slowly ripens to picking maturity.

Rainbow garden

There’s even such a thing as a rainbow garden – there are so many vegetables that are available in colors.  A child could help you pick out and plant seeds for purple or white carrots, black or pink tomatoes, blue or orange bell peppers, or even purple cauliflower.  The garden doesn’t have to be all green – it can vibrate with color!


rainbow carrots 2

Does your child’s school have a garden?  School gardens provide a wealth of learning and teaching opportunities.  There are now a wealth of curricula available online for teachers (and parents) to access.  One site that comes readily to mind is www.edibleschoolyard.org  . The Edible School Yard Project was started by Alice Waters (of Chez Panisse in Berkeley, California) a decade or so ago.  I could get lost on the site, with all the lesson plans, searchable under a number of variables, and constantly being added by teachers under an open source program.

Here’s a look at one school garden I visited recently – the 3rd and 4th graders were harvesting broccoli and they had cabbage heading out beautifully.

Moss Haven cabbages

Another curriculum that is becoming available soon is from SlowFood USA (www.slowfoodusa.org ) The Slow Food National School Garden Program is developing curricula for elementary through high school. The curriculum can be accessed online as it becomes available.  Further, some assistance for starting up and maintaining school gardens is available through a grant from Chipotle. Contact your local Slow Food chapter (www.slowfooddallas.com ) for more information – or you can email me (I’m working on the Garden Committee for SlowFood Dallas) at info@AnitasArbor.com .

Compost Those Leaves!

Now is the time to gather the leaves for your compost pile – I see bags and bags on the streets, and they will be picked up and gone to the landfill and not available until next year!  You need those leaves for mulch for your plants as well as compost.  AND, if you start your compost pile now, you should have rich, rich black compost with which to mulch your spring garden!

My friend Melanie, a Master Composter, will be teaching a class on composting at Trinity Haymarket (1715 Market Center Blvd in the Design District in Dallas) on Saturday, February 21, at 10 am.  It’s free and she is a great teacher.

In addition, Trinity Haymarket is taking orders for worms (for vermicomposting) as well as worm castings (Wow! do plants love those!) for delivery on February 21.  The worm products are from Texas Worm Ranch, owned and run by Heather Rinaldi. Located in Garland, she also has some dynamite classes for gardeners.

If there is one thing that is most important for the garden, it’s COMPOST!  And it doesn’t need to cost anything. You just use the materials you have around the house.  Compost happens when carbon and nitrogen-based materials are broken down by bacteria and fungi and become rich, black soil.

You can see compost when you go to a forest, and dig down a bit into the ground under foot.  It has happened slowly, as leaves and other matter have been deposited and then moistened with rains and decomposed.  It’s a natural process. Compost bins simple

All that you need is a place to start a pile – you can make it simple, like the photo which shows my friends’ wire bins, or you can buy a really nice aerating compost cage or a compost tumbler.  It just depends on how much time you have (do you want compost really quickly, or can you wait a few months?).

What goes into compost?  The rule of thumb is 3 parts brown to 1 part green.  As you build the pile, you should water it down – not wet as in dripping, but moist like a wet sponge.  It will help the little microbes get going better.  A dry pile doesn’t work or heat up very well.  And if you want compost in about a month or so, then you have to turn it and make sure everything is moist as you turn it.

There’s a list of the browns and greens below as a guide for you.

Browns (these are carbon sources) 

cardboard (shredded is best)

wood ash (but not much)

dead, woody plants (chipped/shredded trees, brush)

leaves – dry, yellow or brown

grass – brown only

sawdust

straw

dryer lint, vacuum cleaner waste

paper or wood products –(e.g., shredded newspaper, magazines if not too much slick paper)

natural fibers – cotton (100%), wool, silk


Greens (these are nitrogen sources)

grass clippings

hay

fresh green leaves

manure

kitchen scraps – no meat

coffee grounds/tea bags – make sure filters are biodegradable


Items NOT to add: 

Animal products (e.g., meat, cheese) – they can introduce disease and unwanted bacteria as well as attract critters to your pile.

Diseased plants – these can pass diseases to your garden through the compost. The only way to do away with diseases (and weed seeds) is to make sure your compost pile heats up.

Sawdust and wood shavings are okay, as long as they do not include things like bois d’arc, or cedar because these tend not to decompose easily, nor do they encourage micro-organisms.

The Smaller the Better

When putting items on the compost pile, think smaller – break or shred or chop larger items so that there is more surface area for the microbes to act upon.  The bigger the pieces of material, the longer they take to break down.

When you turn your pile, break up any clumps that you find.

Turn Your Pile Often

This keeps things moving and aerates. It also lets you see how the pile is working. An aerated pile heats up with the microbial activity.  And you’ll know when it’s done because it will be crumbly black and rich, and smell earthy. pelicans

Just a side note, while I was out visiting my friends in East Texas, not only did I notice their great, simple compost bins, but I also watched the pelicans who inhabit their little lake, taking advantage of the plentiful fish.  It was a pleasant, peaceful time.  I sometimes forget about the wonderful places in this great state of Texas!
 

Building a New Way….in Community Gardens

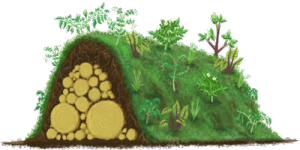
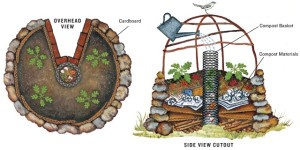
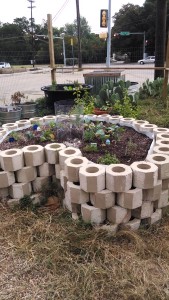
I was musing yesterday as I was visiting a budding community garden. Most follow the model of outlining beds using timber and then filling in with soil. Sometimes there is a compost pile and compost and mulch are applied sparingly. What if there is another model that is yet to be implemented which is water-wise and drought tolerant? Much like the beds I saw (and posted a picture of them) in the southern Dallas county garden – outlined with logs from the property, filled with mulch several inches deep and with ollas for watering. What if hugelkultur beds became the norm – like a community garden in Plano is working toward? Or keyhole gardens? or other techniques borrowed from drought-stricken areas around the world? If we are to continue to install gardens for the community – and promote and practice farming in the city – then we need to think outside the box as water restrictions become the norm rather than the unusual.

hugelkultur bed

Hugelkultur comes from Eastern Europe, and mimics the forest floor – with wood then twigs then leaves then grasses, all of which compost and then dirt on top.  As the wood deteriorates, it creates a rich environment for the micro-organisms and fungi that are necessary for drawing nutrients from the soil and making them available to plants.  Also, as the wood deteriorates it becomes spongy and holds water.  The net result is that a hugelkultur bed, once established, needs much less watering than a traditional garden bed.  A great reference from a pioneer in the refinement of this technique is “Sepp Holzer’s Permaculture: A Practical Guide to Small-Scale, Integrative Farming and Gardening.”


The keyhole garden technique was developed by nonprofits working in dry-land Africa. The goal was to create a garden bed that would grow the maximum amount of food crops for families with a minimum of water. It is essentially a compost pile within a wall.  Once the bed is established, the central wire cylinder is the place that compost (kitchen scraps and other compostables) is placed, and any watering that is done is in the cylinder.  The moisture is then pulled out into the soil where the roots are as it is needed.  A structure of bent PVC pipe creates a framework to support either shade cloth, to protect plants from searing summer sun, or poly to extend the growing season from early spring to late fall and possibly through the winter here in North Texas.  Dr. Deb Tolman, from whom I learned the technique, says that you start with a dumpster load of cardboard that goes into the garden, along with piles and piles of leaves, newspaper, food scraps, manure, old cotton t-shirts, straw, grass clippings, and anything else that is compost-pile fodder.  These are carefully moistened as they are stomped down and compressed before additional layers are added.  Then the whole thing is topped by compost and top-soil.  And planted.  Building a keyhole can be a group party – with a large group, once the wall is built, it only takes about 2 hours from start to planting!

One important advantage of a keyhole garden is that it is perfect for someone who cannot bend over to weed or plant, yet wants to continue to garden.  It’s a raised bed extraordinaire!

Contact me if you want a hugelkultur bed or a keyhole garden to be part of your gardening experience this year!

Community Gardens Are Busting Out All Over!

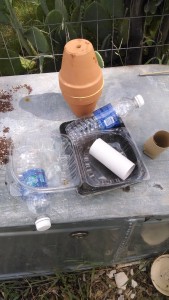
potting trashThe last two weeks have been hectic.  The Community Garden Conference in Grand Prairie, sponsored by the Tarrant County Food Bank and assisted by the North Texas Food Bank, was well attended.  I was there with GROW North Texas; we team-taught a seed starting class.  Andrea, the GNT Farmer Advocate talked about soil mixes, while I got my hands dirty and muddy, mixing up the seed starting concoction, and then I lead the “trash talk”.  In other words, how to start seeds by repurposing things like toilet paper rolls and empty water bottles; how to roll a newspaper pot with a spice jar, and how to convert a strawberry clamshell into a mini-greenhouse.  It was lots of fun, and a majority of the attendees took advantage of the hands-on, to plant some seeds and make some seed-starting pots.

DK raised bed

On Sunday I had a chance to visit Divine Kinship’s project in southern Dallas County.  They are working with permaculture instructor Nicholas Burtner to transform a 3+ acre piece of property that is currently grass and cedars.  It has a lot of elevation changes, a seasonal creek on one side, and a variety of soils ranging from caliche to sand.  It’s almost overwhelming all that they have to do to transform the property into a food forest and permaculture scape.  But large jobs are best broken into manageable pieces, and they are setting up raised beds, with plans to start planting in the next few weeks.  The beds are crafted from logs, and filled with wonderful mulch that will break down into incredible soil.  The mulch will also hold water from the rains.

Note in the middle of the bed you can see some reddish bumps with white dots on top.  Those are terra cotta pots, made into ollas, with rocks covering the holes on the top.  I’ll be teaching a DIY olla class, as well as using other recyclables for repurposing soon.

Winter Vegetable Planting!

It’s still possible to plant winter vegetables and get them up before the warmth of late spring gets to them.

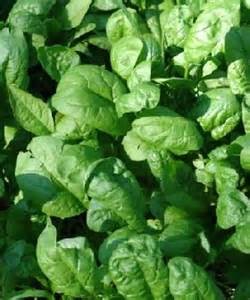
SpinachI’m going to be adding more spinach (40-50 days to maturity). But I could also plant arugula (40 days), turnips (50 days), carrots (60-75 days), (red) mustard (45 days), bok choy/pak choi (45-55 days) , collards (70 days), chard (50-60 days), kale (40-60 days depending on variety) and … at the end of the month … lettuce (50-60 days) and peas (snap peas as early as 55 days, others up to 70 days). And don’t forget radishes!  They can be seeded and harvested within 30-45 days, depending on the weather.

I was on a tour of community gardens in Dallas last week, and we saw someone with some peas that were at least 2′ high!  We all marveled that they had survived, given that the day was in the 20s with a wind chill! But the tour also brought home to the city planners for whom the tour was organized, that gardening can be done in North Texas year-round.

There is no right or wrong with gardening. No one is going to come and take your garden away if you don’t succeed! Your reward is vegetables.  If you plant something and it doesn’t thrive, it just means you have learned something.  You can hedge your bets by following guides for best dates to plant, but they don’t always work – particularly if we have a late freeze or spring comes early and summer heat comes earlier. Sometimes it’s fun just to try something outside of the guides – just to see if it works! Like the year I decided to winter-over my chard and I found out it can be grown in this area like a perennial.

Gardening is about finding out what works for you, for your gardening style and your location.

And remember….if our average last frost is in mid to late-March, starting some vegetables from seed 8-10 weeks earlier indoors means you’ll have transplants ready to go into the ground on time!


Out of the Starting Gate!

During the cold days the plants may be dormant, but we can’t be.  Too much to do – planning, mostly.  When I was by the community garden on Saturday, the giant red mustard was indeed giant – about 18″-24″ leaves.  I’d cut a few leaves from the outside about 10 days before, and it just stimulated the plant to make more leaves.  Yum.  The taste is a bit sharper than green mustard, but the greens I cooked last night were scrumptious, when mixed with chard that I also harvested.

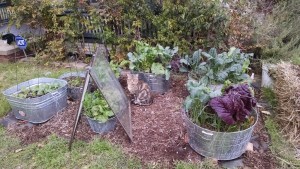
In my container garden, however, the mustard is not growing quite so large.  Note to self – don’t plant so many things in one container!  Evenso, the mustard leaves in the container are at least 12″ when planted with broccoli and chard. As shown in the picture.

Mustard

So how do I cook greens (all types)?  With garlic and olive oil.  I sautee the minced garlic in olive oil in a thick-bottomed sauce pan till it’s soft, then start adding the chopped greens, making sure they are olive oil’d before adding another bunch.  Then I add about ½” of water in the pan, and slap on a lid, turning the fire down low.  Let them cook about 10-15 minutes, till done.  I served with beans and cornbread last night, but greens alone (maybe with some pepper sauce!) or with poached egg are good. Both tasting good and good for your body.

So after all that, I’ve resolved to order more giant red mustard seeds and plant some more while it’s still cold. I order mine from Southern Exposure Seed Exchange (see last week’s post for more information on this excellent source of non-GMO seeds).

Mustard seeds

The community garden’s spinach is doing well.  We planted in mid-November, alternating rows of spinach and carrots (I’m partial to the red-cored chantenay).  Both are about 4-5” high and the spinach was so thick, we thinned to 4” apart, picking the largest plants to leave room for the smaller ones to grow larger.  In about a month, we can start harvesting the carrots – they are already baby-sized and (I tasted one) so sweet.  Something to look forward to.

On another note, I visited family over the holidays, and was discussing gardening with a relative.  We looked out the sliding glass doors (okay, it was just too COLD to go out and look closely), and I saw barren beds, with dry dusty dirt exposed.  I looked at the barren trees in the yard and asked what happened to the leaves.  The yard man blows them together and bags them and hauls them off.  I restrained myself – leaves are the BEST mulch for wintering barren beds.  They preserve and nurture all those soil micro-organisms that are crucial to a plant’s well-being.  And they hold moisture in the ground so that what plants are left (like shrubs) are protected from the cold.  Since the relative had cardboard in her garage, I suggested that she put it out as mulch and wet it down good. Take a deep breath.

Now for my rant:  don’t let those leaves go into the landfill!  They are so valuable for your plants during the winter as well as your lawn.  If nothing else, put them on the compost pile. That’s how to return the nutrients to the soil.  That’s how nature does it and replenishes soils year after year – think about a forest floor, that is soft and moist and alive and rich.  That’s how all our growing beds should be.


Gardeners….It’s Seed Ordering Time!

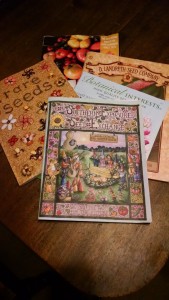
The garden catalogs are arriving in my mailbox, and I scan the pages, dreaming of wonderful plants for the spring, summer and fall.  The neat thing is that I get the paper catalog (okay, I’m a throw-back and love to touch it, see it, and feel it), but I can order online! Best of both possible worlds.

Seed catalogs

My favorite seed companies each have a unique offering.

The Southern Exposure Seed Exchange (www.southernexposure.com) is located in Virginia, so I can be assured that the varieties they offer are probably going to work in Texas. I love reading the descriptions of their offerings.  All seeds are coded for those best suited for the Southeast, heirloom, ecologically grown and USDA certified organic.   The heirloom varieties often have an indication of when they were “discovered” and where they originated.  For example, “Fish Pepper…African-American heirloom from MD.” or for carrots…”Chantenay Red Core…introduced from France in the late 1800s.” or “Cosmic Purple…yellow and purple carrots were first recorded in Asia Minor in the 10th c. For the first few hundred years of managed cultivation, carrots were predominantly purple.”  Wow!  A history lesson along with descriptions.  SESE also carries grains and cover crops:  want sesame? hairy vetch? red clover, sorghum and broom corn?  They have seeds!

Baker Creek Heirloom Seeds (www.rareseeds.com) perhaps has the most extensive catalog – it’s almost like a thin book!  Baker Creek is located in Mansfield, MO, so I can be assured that I can find varieties that will work well in Texas. They carry vegetables, herbs and flowers. I can also get flax if I care to try growing fiber crops.  The pictures are incredible.  One eggplant that caught my eye was the Turkish Orange. It’s described as coming from Turkey. “The 3” round fruit are best cooked when they are green to light orange.”

Botanical Interests (www.botanicalinterests.com) is located in Colorado.  But it has some very interesting varieties and a wonderful selection (3 varieties) of Texas Bluebonnets in their flower section. I think one of the heirlooms I’m going to try this year is the Scabiosa Pincushion Flower. It’s described as “Perennial. Blooms summer through fall.” Sounds wonderful with blue-purple and white flowers. On the peppers page, I learned that peppers have been around since 7500 BC and are cultivated around the world. Columbus brought the spicy pods back to Spain and about 50 years later “they were being grown throughout Europe, the Mediterranean, the Middle East, Asia and the African coast.”  The selections are not quite as extensive as offered from some of the other seed merchants, but there are good, solid varieties.


The Landreth Seed Company, “purveyors of find seed since 1784,” is based in Pennsylvania (www.landrethseeds.com). Their catalog has the look of an heirloom.  They even have a section specifically for a children’s garden. Vegetables offered are selected for their interest, such as purple plum radishes, African mini-bottle gourd, and Mexican sour gherkin.  All varieties that are selected for their potential attractiveness to children. One section highlights varieties best suited for a patio/container garden.

The Pinetree garden seed catalog (www.superseeds.com) is a new one for me this year. Pinetree is located in Maine, so I will look through it to locate varieties that may be experimental for me.  They also offer loose tea, such as “Nilgiri – organic, fair trade certified.” They offer culinary herbs, medicinal herbs and dyeing herbs as well as tobaccos for the gardening.  I may try out the Hopi Red Dye Amaranth this year, since I’d really like to try dyeing some of my wool with reds.  Pinetree was my source for the Bhut Jolokia (Ghost Pepper) seeds. It is described as “A legendary variety from India with its extreme heat, said to be one of the hottest pepper[s] in the world with a Scoville rating over 1 million units.”  They take about twice as long as other peppers to mature.  But my youngest daughter and her husband like to try extreme peppers, so this was a good choice for them to try.  Note:  only 20 seeds are in each packet!

It’s a good idea to order seeds (at least for spring) soon, because if a transplant goes in mid-March, but is started indoors 8-10 weeks before planting, that means January is the time to start those seeds!

We’ll talk more about starting seeds in the coming weeks.

INTERPLANTING FOR TWICE THE HARVEST; UPDATE ON MICROGREENS

Interplanting is a technique that is used to obtain twice the harvest from the same space.  For instance, I will plant root vegetables (that use the growing horizon under the surface) with a leafy vegetable (that uses the growing horizon above the surface). One combination I use is carrots and mustard/chard/spinach.  Another combination I like is turnips with bok choy. 
 
Greens
I winter plant my carrots in the midst of other plants (e.g., greens) because the greens protect them (it’s called using nurse plants) until the nurse plants are harvested – usually about the time the carrots are ready to take off (in January and February). That way, I get bunches of carrots when I’m getting ready to plant the spring garden. 
Meanwhile, the greens in my outdoor garden are getting larger.  Every time I harvest some, it seems more grow to take their place.  The red mustard must be at least 15-18” high!  The lettuce is about to bolt, so it’ll go into my salads this week.  I think I’ll plant more red mustard for the color as well as the nutrients.  Of course, the kale is happy, and I see the carrots are starting to take off.
Work is continuing on the compost pile, while the microgreens grow higher – selectively. 
compost-2Bturning
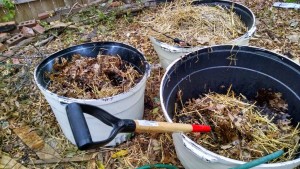
I decided to use three containers for the compost pile, especially since I had 2 containers’ worth of leaves and chicken coop straw.  With a third, I was able to turn the first pile and make sure it was moist.  Green matter from the kitchen was added and mixed in well.  I was able to use a short-handled fork – one that is commonly used to turn over garden areas.  The second container will now be turned into the first, which is now empty.  I’ll probably cover the “completed” one to let it heat up; but I’ll continue to turn it on a weekly or bi-weekly basis to make sure it’s aerated.

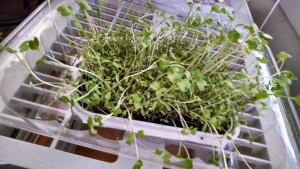
The microgreens are about ready to harvest with kitchen shears – at least SOME of them are.  I’ll have to taste them to determine which ones are the fastest growing.  I may share some of these with my chickens. In fact, I’ll probably prepare another tray of microgreens just for them.  At the rate the greens are growing, I could start a tray about every week or two and have a steady supply of tasty salad add-ons throughout the winter!

micro-2Bgrns-2Bwk-2B2