Seeds Have Arrived!

The seeds for the spring garden (and beyond) have arrived!  To me, there is nothing more hopeful than seeds; they represent new life. Children, especially, seem to be excited by seeds.  I’ve watched as they sort through a basket laden with seed packets, dreaming and wanting to plant everything.

            Seeds represent dreams.  We can dream of the foods we will eat and the flowers that will bloom.  We can dream of the joy of planting the seeds, and cultivating them, to be rewarded with plants growing.

            So I share with you the hope that these seeds bring – of an abundant garden (no matter the size!).  Hope, which fills this Christmas season.   

I hope that your Christmas season is joyful and full of hope and dreams. 

How to Move a Garden

This past month has been occupied with moving a 750 sq ft garden from a site that is being converted to an access road. Although a permanent location is not solidified, nor is the design, the temporary arrangement is …. crates! About 110 sq ft of crates!

This was our garden … RIP

Milk crates (12″ cubes) are being used for the primary (new) crops, while vegetable crates (22″x14″x9″) are housing the asparagus crowns and the strawberries. Liners for the crates vary: the vegetable crates holding asparagus are lined with burlap bags, donated by a local coffee roaster. Since the burlap will deteriorate over time, when the asparagus needs to be transferred to its permanent bed, we can just lift the burlap and crowns as a whole and place in the bed, with minimum disturbance. When we moved the asparagus we carefully dug as far under the crowns as possible to minimize disturbing the roots. After a rain, they crowns have produced another crop of fronds. This is a good sign.

The strawberry crates are lined with net bags that housed onions for transport. Again, the strawberries were lifted with as much native soil as possible so that there was little shock. They have now been thinned and are mulched for the winter.

The milk crates are lined with weed barrier, to allow for drainage, but not allowing the soil to leak out. They are filled with soil from the garden and seeded with kale, spinach, carrots, turnips, arugula, and chicory greens. Take a look at the kale and spinach, thriving in the fall weather in its new home!

Thriving kale and spinach!

Now, as an aside, I’ll say that the milk crate garden idea comes from the Riverpark Farm NYC, which created and maintains a large farm solely in milk crates! And milk crates are so portable, that the farm has moved a couple of times since its inception. It’s a marvel.

So … here in Tulsa it can get quite cold. There is a plan. There are two methods that we used in the old garden beds:  mulching heavily and using row cover. The new, temporary, garden will receive those two treatments.

The asparagus already has been given a mulch of straw.  The mulch will insulate from temperature extremes, and will help the soil hold moisture when it rains (or we water).  When the spears turn yellow, we will cut them to about 1-2” and then mulch with about 3” of straw.  This should carry them through freezes.

 The strawberries are getting some light mulching, but as the freezes start we will be adding straw.  In February of this year, when the Great Freeze happened, we completely covered the plants with straw.  When the weather began to warm again, we pulled it aside and the little green leaves perked up.

As for the rest of the crates, we’ll be creating a microclimate.  That means modifying the environment around the crates to lessen the impact of extreme weather.  In the next few weeks, bales of straw will be placed on the north side of the milk crates.  The straw will protect the crates from north winds.  Then the crates will also be sporting hoops to support row cover.  The row cover will also lessen the impact of weather extremes.  And, if it snows or ices, the snow/ice will settle on the row cover and become insulation! 

Beginning Gardening Series – Water Part I

A plant needs sun, soil, water, and air.  We’ve covered sun in the last installment.  Now let’s talk about water.

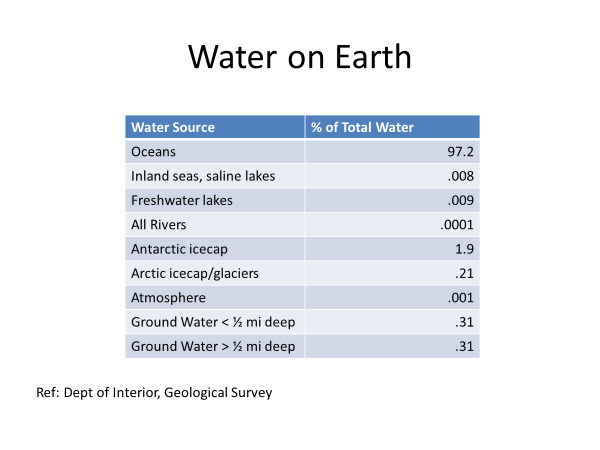
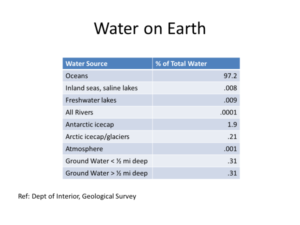
Water is a precious resource.  Below is a graph courtesy of the Department of the Interior, Geological Survey.  If you’ll note the last two lines, only .31% of fresh water is ground water less than 1/2 mile deep.  That’s all the water we are working with !

There are two sources of water for your garden – the tap and rainwater.

Tap Water

Water piped to your property by the city or municipality is the main source of water for home and community gardeners.  There is some concern about the chlorine in tap water, because chlorine can be toxic and kill off some of the micro-organisms in the soil.  Plants do grow better and soil is healthier with fresh rainwater.  Although you can have a thriving backyard or community garden watered by tap water, if this is an issue that concerns you greatly, there are filters that can be installed on the tap or on the garden hose to filter out chlorine. RV stores carry them, as well as major retailers.  They vary in cost from $37 to $100.  It depends on your budget.  A good brand appears to be Gard’n Grow that is made for attaching to a garden hose. An internet search can give you a variety of choices.

Rainwater

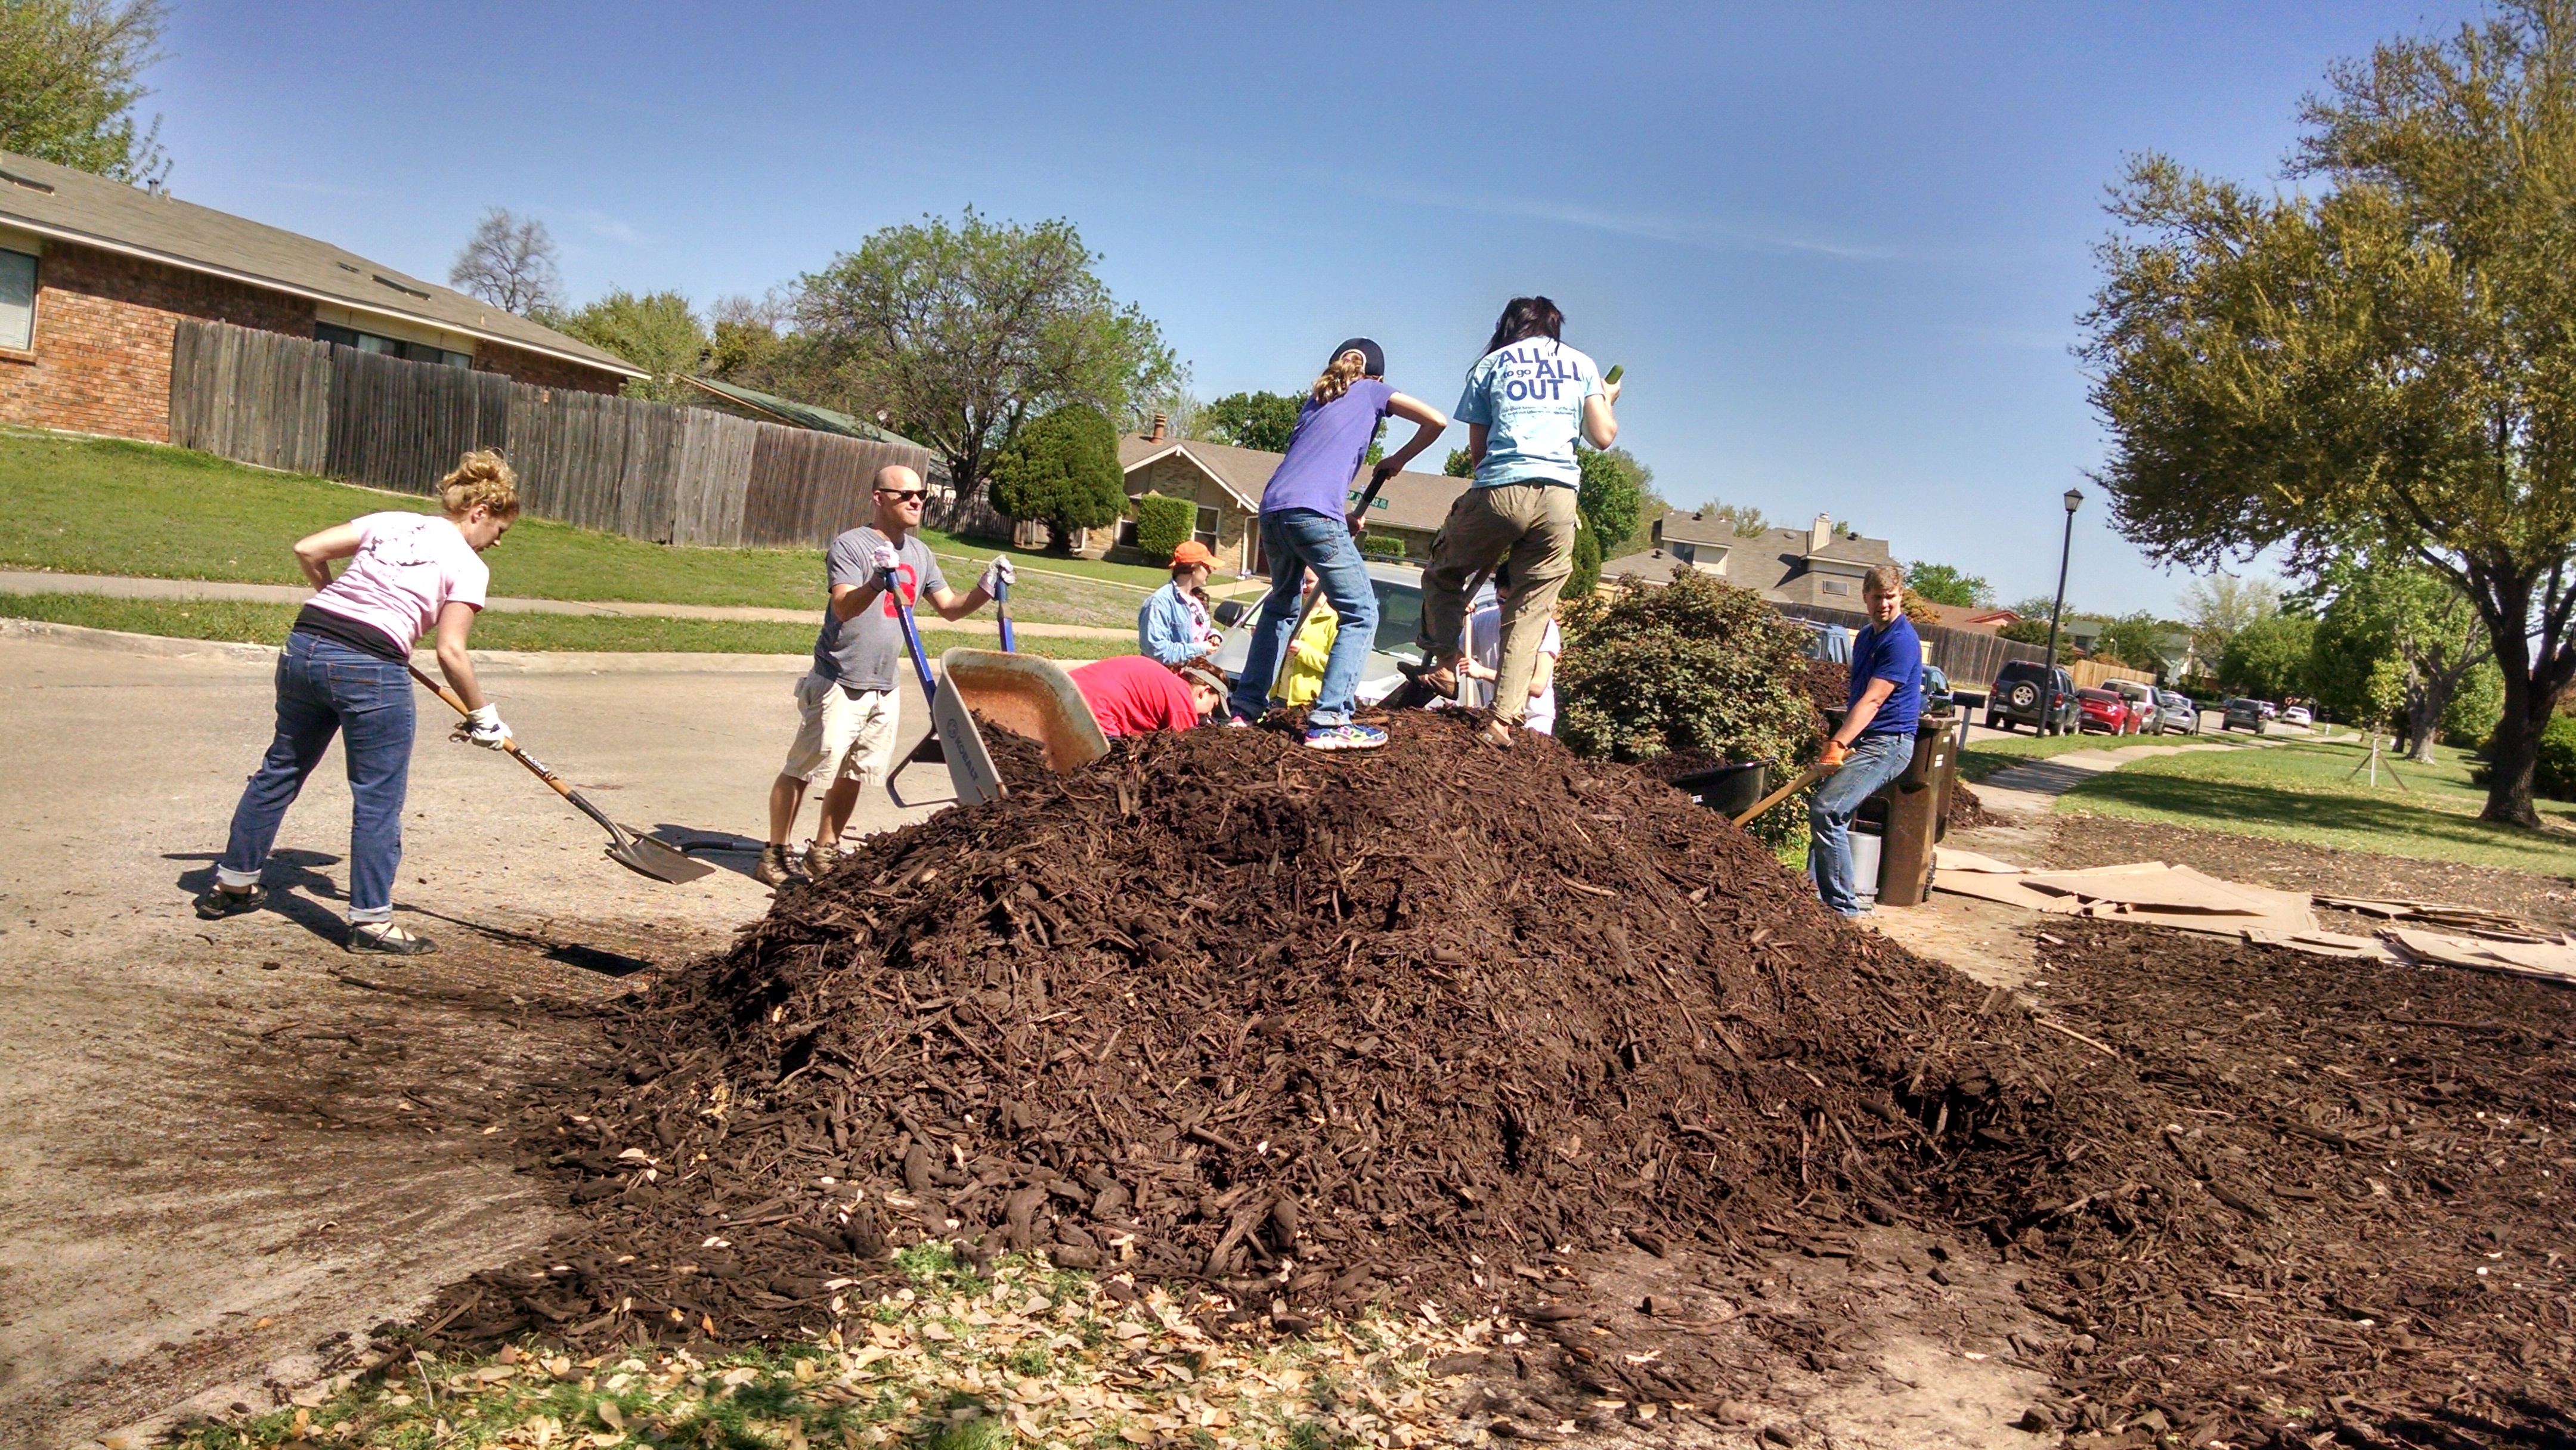
Rain is the best water source for your garden.  Capturing rainwater from roofs entails use of gutters, downspouts, and rain barrels or cisterns.  Depending on what you have available already (e.g., gutters and downspouts), installation of rain collection can be budget-friendly or expensive.  There are adapter kits available at the hardware store to divert rainwater from existing downspouts, into food grade (NOTE:  must be food grade) barrels which can be obtained online or through municipal water collections classes.  A rule of thumb is that a one-inch rain will deliver .6 gallons (that’s 6/10ths)/square foot of roof to your collection point.  So, a 2000 sq. ft. roof would be expected to give you 1200 gallons of runoff in a one-inch rain event.  A 50-gallon drum would be overflowing in a heartbeat.  So plan storage accordingly.  When I attended a class at Texas A&M AgriLife Extension, we were told to plan capacity to hold water equivalent to usage for 30 or more days, depending on the longest average time without rain in our area.

Another way of capturing rain, called “harvesting rain,” is through building soil with organic matter, creating rainwater diversion channels, and use of mulch.  We’ll talk about these methods of harvesting rain in the next module, which will deal with soil building.

Conservation of Water

Whichever way you plan to water your garden, conservation of water is important.  The way in which you water your garden can play a big role in the amount of water you use.

              Rows and Ditches

The old way of planting a garden has been to form raised rows, divided by ditches, through which water flows.  Although it gets water to the root of the plants, a lot of water is evaporated before the water can soak into the soil.

             Hand Watering or Sprinklers

This method is with a hose and spraying by hand.  It is time and labor intensive, and water tends to evaporate on the journey from hose end to ground.  In addition, some plants prefer to be watered at the ground level.  If you hand water, bear in mind that the best time to water is in the morning, to allow moisture on leaves to evaporate during the day.  If you water in the evening, some water stays on leaves, and on the top of the ground, and can promote disease and attract pests.

Watering with sprinklers is similar to watering by hand.  There is lots of water evaporation between sprinkler and plant/ground contact.

            Drip Irrigation

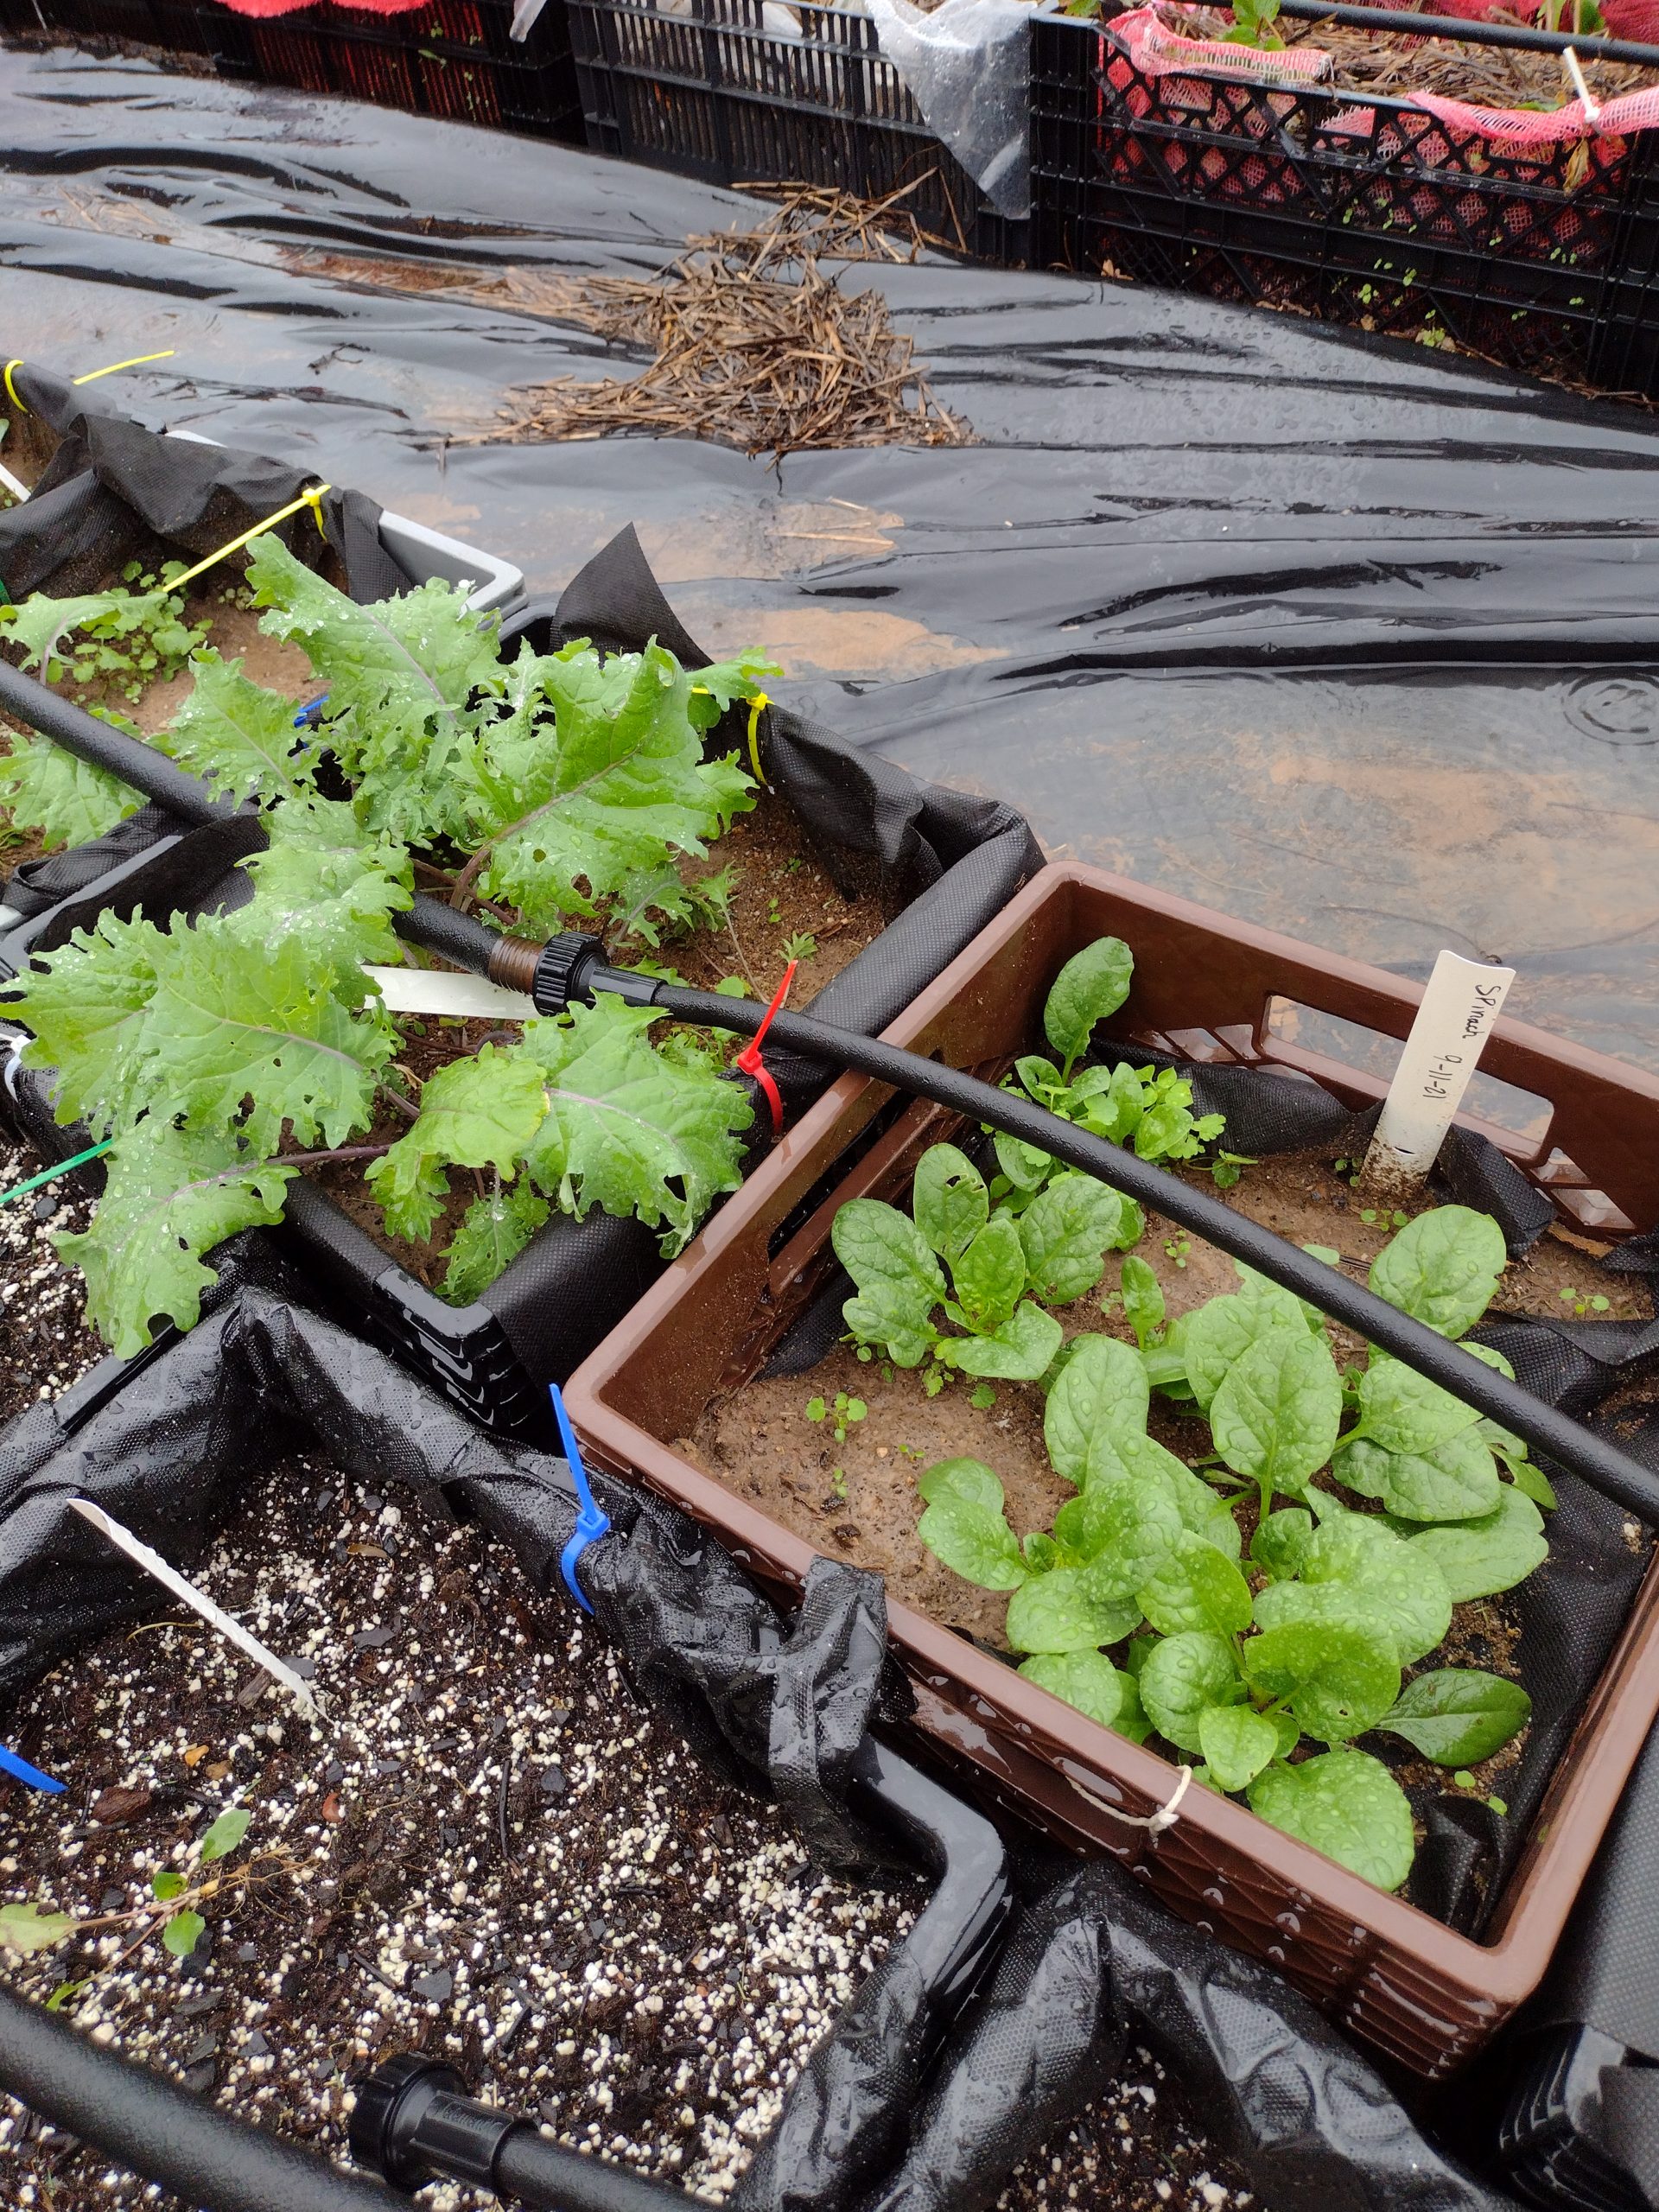
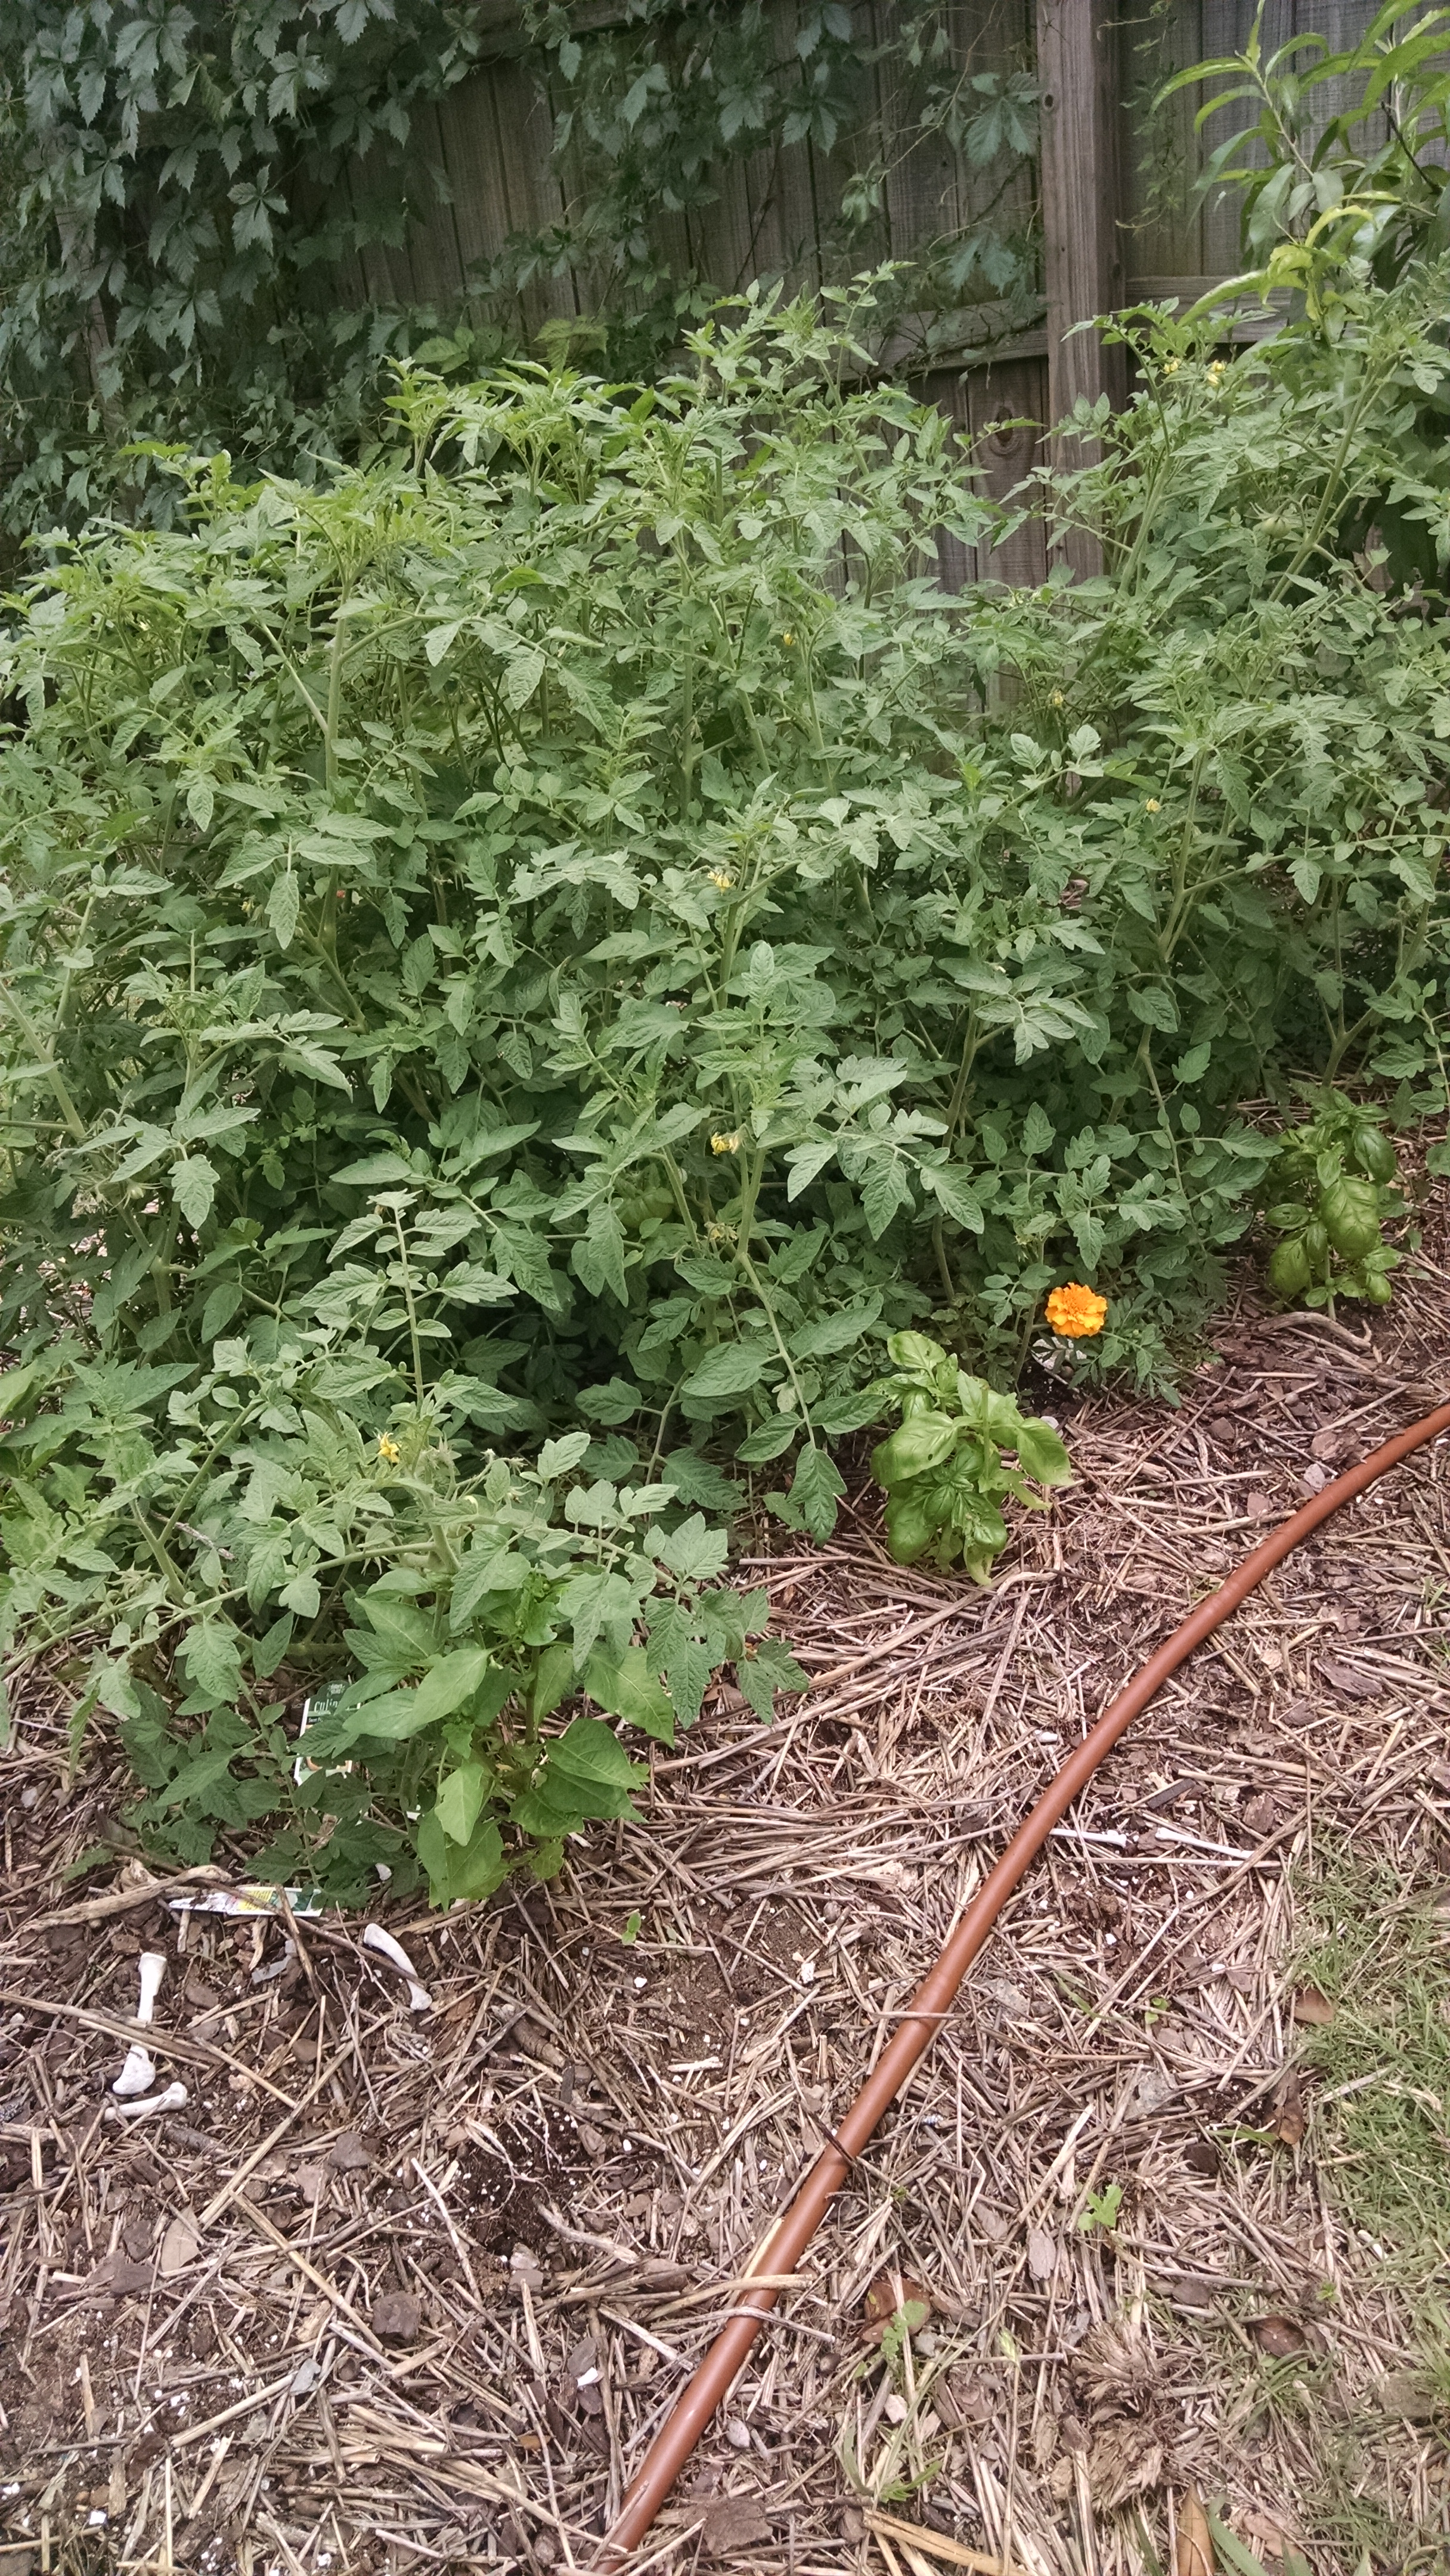
Drip irrigation delivers water at a slow rate, directly to plant roots.  This is the preferred way to water plants.  The slow rate of delivery allows water to soak in rather than puddling around the plants.  Drip irrigation kits complete with hoses and emitters can be purchased at hardware stores.  They can be as elaborate or expensive as you want.

I tend to favor a ½” porous hose, called a drip soaker, which can be purchased at hardware stores.  They last me about 2-3 years before the sun deteriorates them and I have to replace them. The soakers come in varying lengths.  I usually get a long one, with some hose coupling hardware, and then cut the hose into the lengths I need for whatever garden I’m irrigating.  I use “Y” couplings for adjacent beds, and can direct flow to one or the other or both beds at will.

What’s Ahead

In our next post, we’ll continue discussion of watering methods – highlighting the “olla.”  Stay tuned ….


Beginning Gardening Series – Design Considerations

As with any venture, it pays to plan beforehand.  Here are some considerations to take into account when planning your garden.

Sun Requirements

First to consider is sunlight.  Plants need sun.  Most plants need up to 8 hours of sunlight, some can make do with 6 and some with 4.  But you won’t be able to grow tomatoes and peppers if you don’t have at least 8 hours of sun.

Garden Accessibility

Placement of the garden is important.  Is the site easily accessible?  If it’s not, then you probably won’t be visiting it very often.  And gardens require frequent checking.  The ideal spot is close to your kitchen door, or where you will walk every day.  That way, you can eyeball the plants and see if they are thriving, if they need water, if weeds are encroaching, and what can be harvested.  Okra and squash can go from edible to gigantic and woody within a couple of days.  It pays to keep an eye on them daily.

Start Small

What sort of space is available in that sunny area?  Is it small?  Is it large?  The temptation for a large area is to turn it into a garden immediately – and then it gets away from you and grows weeds and you get discouraged.  Even if your family is excited about a garden, how excited will they be when it is hot (for a summer garden) or cold (for a fall/winter garden) and the garden needs watering, weeding, and harvesting?

Time Availability

No matter the size of the space, START SMALL AND SUCCEED.  What time do you have to devote to a garden?  A small plot, maybe two 4’x8’ beds, can be maintained in about 15 hours a day.  For a larger area, such as a 1200 sq. ft. garden, plan on devoting up to 4 hours a day.

In-ground or Containers?

Do you want to prepare an in-ground garden or go with containers?  If you rent and your landlord doesn’t want you tearing up lawn, then containers or straw bales might be the way to go. (NOTE: In the Resources section of this website is a summary of how to build a straw bale garden.)  Alternatively, if your sunny spot is on a patio or paved area, containers and/or straw bales would work well.

Physical Capability

What is your physical capability?  I’m of the age that working an in-ground garden is difficult, with all the bending required, and getting and down and then up again isn’t so easy.  I opted for containers and straw bales in my last house.  My next one, I’ll build raised beds (at least 24” high) to avoid stress on my back.

Agriscaping

Another way to garden is to tuck edibles in and amongst your ornamental plantings.  Some vegetables can be very pretty and colorful (bell peppers come in purple, yellow, red, as well as green).   This is called “agriscaping.”

Budget

And then there’s money.  How much do you want to spend on building your garden?  There are ways of digging in-ground beds and building soil that are inexpensive, and there are methods that are as expensive as you want them to be – like building raised beds with timbers, bricks, pavers, or rock.  Look to your budget.

Width of Beds

If you are planning go build the garden in-ground (or even if you build wooden boxes for raised beds), consider how wide the beds should be.  Three feet wide is an easy width for accessing even the middle of the bed from either side.  A four-foot wide bed might be a stretch.  And why is this?  Because you don’t ever, ever want to walk on the planting beds once they are set up.  Walking on the beds compacts the ground and reduces the ability of the soil to absorb water and provide ease of penetration for plant roots.  We’ll get into soil building in another module.

What’s Ahead

In the next installment, we’ll talk about water for your garden.  Stay tuned ….


Beginning Gardening Series – Why Grow My Own Food

One of the questions I am asked, is “Why should I grow my own food? I can get what I want at the grocery store, even organic produce.”

I Eat Healthier

There are several reasons that I have always grown some of my own food.  One of them is that it promotes healthy eating.  I am much more likely to eat a variety of vegetables if I have just picked them from my own garden.  Sometimes I decide what to cook for dinner depending upon what is ready for picking.  I also find that the vegetables that come from my garden taste better. This is because they are picked just at their prime.  Vegetables at the grocery store, even organic vegetables, are harvested one or more days (sometimes weeks) before they are offered for sale.  Because they have to travel varying distances from the farmer to you.

Good for the Planet

And that brings me to another reason for growing my own:  food from my garden doesn’t travel so far.  Think of the use of fuel to transport vegetables and fruits from South America, or even across the U.S. There is no use of fuel to transport vegetables from my garden to my kitchen – just good ole steps for my fit bit to record!  I’ve heard it said that the average distance a vegetable or fruit travels is 1500 miles from farmer to plate.  That’s a lot!  In fact, it takes between 7 and 10 calories to produce and deliver 1 calorie to your plate.

Grow or Buy Local

That’s also why I urge folks to buy from local farmers what they do not grow themselves – the transportation distance is much less, and the vegetables are usually harvested within 24-48 hours of when they appear in the farmers market.

Better Nutrition

Getting back to healthy eating, a March 2008 report was released that said organic plant based foods are more nutritious and provide an average of 25% more nutrition than conventional foods at the grocery store.  This study was based on a comprehensive review of 97 published studies comparing the nutritional quality of organic vs. conventionally-raised foods, controlling for level of maturity, handling after harvest, and testing in the same form.  Further, there are more studies showing that pesticide and herbicide residues are still on the conventionally raised foods that are offered for sale at the supermarket.

Biodiversity

Home gardeners often choose to grow heirloom and heritage varieties, as opposed to conventional varieties of vegetables.  This practice preserves biodiversity of our food.  We are losing biodiversity at an astonishing rate. As agriculture has become more and more the realm of agribusiness, crops are selected for their uniformity, ability to be machine harvested, and maturing at the same time for efficient harvest.  AS a consequence, fewer and fewer varieties are being cultivated.  According to the FAO (Food and Agricultural Organization of the UN), 75% of plant genetic diversity has been lost worldwide since the 1900s.

Well-Being

And finally, I garden because I experience a feeling of independence, even by growing one or two vegetables. I also get more vegetables for my dollar when I grow my own.  And there is the feeling of well-being that comes with digging in the dirt and watching a plant grow and the eating the food it gives me.  That feeling of well-being is also why gardening is used as “dirt therapy” for veterans with PTSD, as well as in prisons (there is a marked reduction in violence), and in people who are dealing with emotional and mental issues.

In short, there are a number of reasons to garden.

What’s Ahead

And in the coming installments, we’ll talk about what you should consider when planning a garden, what to plant, how to plant, and how to harvest.  Stay tuned ….

SEEDING Dallas II is Next Saturday!

Our mini-conference on urban ag is scheduled for November 11, 2017, at the Owenwood Neighbor Space (formerly Owenwood UMC).  We have three tracks:  learning gardening, community garden management, and market gardening.

Registration is only $10, and it starts at 8:30 am, ends by 1:30 pm.

Here’s the link to register:  http://www.grownorthtexas.org/events

See you there!

Fall Planting – Mulch and Crop Rotation A Must

So fall is upon us. Just like spring, it’s time to think about planting!   So what do you consider? First, there’s mulch and feeding the soil. Second it’s planning what to plant – and that means rotating crops.

Mulching

Mulch, mulch, mulch. That means don’t till. Do you know what happens when you turn over the soil? You destroy this whole civilization of micro-organisms that are just waiting to help your plants grow! Can’t you hear the screams?

Okay….maybe I’m exaggerating a bit, but there is a whole world of life in the soil ecosystem. It starts with mycorrhizal fungi that form the base of the pyramid. These little folks send out microscopic hairs, called hyphae that go through the soil and grab minerals and nutrients and bring them to plant roots.

What happens when you till or turn over the ground? Those miles and miles (yes – in a small space!) of hyphae are broken and have to re-grow. Which takes time that they could otherwise be feeding your plants.

Instead, add organic material on top of the ground – like leaves, or compost, or mulch. That way, you’re giving the bacteria (who also live below-ground) something to munch on and add to the fertility of the soil – as well as its moisture tolerance.


Crop Rotation

Certain plants grow best when they are planted after another type of plant. For instance,

Legumes (think: beans and peas mostly) fix nitrogen from the air to the soil for leafy plants.

Leaf Plants (as in coles, leafy greens and corn) like lots of nitrogen. They grow best when planted after the legumes.

Fruits (as in tomatoes, eggplant, cucumbers, squash and melon) like phosphorus to set fruit, but too much nitrogen prevents them from setting the fruit. They just grow and grow and grow, but don’t set fruit.

Roots need even less nitrogen, but they need potassium. Roots include beets, carrots, turnips, radishes, garlic and potatoes.

Then cycle through again.

It’s also important to note that when you plant certain things in the same place year after year, they get covered with pests – like tomatoes get covered with hornworms. So never plant tomatoes in the same place year after year. Even if that is the best sunny spot.

So Rotate, Rotate, Rotate.

A Squash Resistant to Those Borers!

At the recommendation of a gardener at Homestead Heritage in Elm Mott, Texas (a great place to visit! or take classes!  http:// www.homesteadheritage.com) I tried Tatume Squash this year.

She told me that it was resistant to squash vine borers. Since I have been plagued by them, and the only remedy that seems to work is to inject starts with bt, I decided to give it a try. I’m a bit lazy in my own garden and have been seeking other ways of avoiding the dreaded vine borer.

But a warning is in order … this plant SPREADS! I’ve been redirecting runners from the neighboring tomato (which is doing its own spreading into the rosemary close by) and sending it towards the lawn. The seed catalog says iit can send runners up to 15 feet or more. So leave it lots of room.

You can still plannt Tatume by seed. It’s a native of Mexico, but available from Baker Creek (www.rareseeds.com).

I have two plants and have started harvesting. I cut off my first squash – all of about 3-5 lbs! I was leary of a woody fruit, because that’s what you get with zucchini that gets away from you.

image

I was surprised … it was just like a BIG small zucchini inside. I cut large slices about 1/2 inch thick, slathered with olive oil, garlic and pepper, and fried it in the cast iron skillet. When it was browned, I added a bit of water to help it cook. You could also grill it.

It was very tasty. Next, I’ll try cubing it and cooking in a stew with some Rotel tomato/pepper, garlic and onion, for serving over rice.

I’ll probably let the next squash get a bit bigger to see how it fares cooking and eating-wise.

Drought Planting Technique Works in Flood….and Carrots

A few weeks ago, I wrote about planting techniques that worked in drought conditions.  Now it’s apparent that heavy mulching also works in flood.

A garden columnist recently recommended that gardeners just pull their spring tomato plants and give up until fall planting. The reason was that so many tomato plants were suffering from the abundance of rain, and suffering from fungus and other ills caused by wet conditions and wet feet.

Tomatoes may 2015

However, as you can see from the pictures, tomatoes planted using heavy mulch – and in some cases only mulch – fared quite well and are flourishing and producing tomatoes.  The tomato plant in my straw bale also is doing well, blooming and getting ready to put forth tomatoes.  In addition, my container tomato just yielded a lovely cluster of cherry tomatoes.  It is not suffering either.

The secret?  DRAINAGE.  As long as the days are long, there are a reasonable number of days in the 80s, and the plant’s feet are wet, the tomato will be just fine.


What about fall tomatoes?  There are a couple of ways to achieve this without going out and buying new transplants (although it’s nice to support local businesses).

First, June is the time to start seeds so that your seedlings will be ready to plant in time for a fall crop.

Second, the suckers that develop at the junction of each tomato branch can be removed and placed in a rooting mix to develop roots and should be available for transplanting in time for a fall crop.

Finally, there is the lazy person’s way…just prune those plants that are doing well.  Tomato branches that have borne for the spring will be less likely to bear fruit for the fall.  So, prune them off during the heat of the summer when production has fallen off.  Those suckers I mentioned earlier?  Leave them and they will develop new branches, ready to bear at the right time.  You can get two crops off the same plant, without the labor of transplanting or the expense of buying new transplants.


Carrots Carrots 2

I mentioned some time ago that I “winter” plant my carrots.  With the cold weather, their growth and maturity has been delayed, but they are now ready for harvest.  Since the carrots were lonely in their container, I transplanted a couple of tomato plants to keep them company this spring.  As the tomatoes have now grown and need space, I started harvesting carrots.  Wow – was I surprised (I always am)!  Here’s a picture of the harvest of these few.  There are many more waiting.  They are bound for a roasting with some red potatoes and onions, chunked and covered with olive oil and a sprinkling of time.  Add a little water and cover the roaster, then put in the oven for an hour or till everything is nice and tender.  Another lazy person’s dinner – and so delicious!

Carrots 1

Gardening During Drought – Part I

As I was driving through Plano the other day, I was thinking of California, which is in the news with state mandated water restrictions.  There are signs on most well-travelled roads that watering restrictions are in force.  Water conservation is good any time, but with a continuing drought, we have to re-think how we garden and how we water.

There are a number of ways to reduce watering when installing/replanting a garden.  First, the more organic matter that is in the soil, the more it will hold the water it gets.

Sometimes folks use things to break up the soil and aerate it, but don’t realize that it isn’t helpful for holding water.  Peat moss has been the favored clay loosener, but I was reading the other day that peat pots tend to cause soil to dry out faster – leading to more frequent watering.  Does that mean that it also doesn’t hold water as well when mixed in the soil?  A better amendment for potting is sustainably harvested coco fiber – it also holds water quite nicely.

What’s that?!

Coco fiber is that fiber on the outside of a coconut.  It comes in bricks and I’ve seen them available at local garden nurseries such as Redenta’s as well as North Haven Gardens.  The bricks are made of fibers that are dehydrated and compressed. The fun part is when you put that brick in a LARGE container to rehydrate (not the regulation 5-gallon bucket, which I heard one person busted during the rehydration process, because it wasn’t large enough).  Put water in the water in the container with the brick and watch what happens – it’s great for kids to participate in this process.  If you want to get mucky, start massaging the fiber off the brick into the water – you get a slurry of muddy mass.  THIS is what you use to mix into potting soil or into raised beds to loosen clay, aerate the bed, and provide moisture retention.

Because the coco fiber does hold moisture – you just witnessed this quality when you rehydrated it!

So we need organic matter – that also means compost and lots of it!  If you haven’t started your compost pile, now (whenever now is) is the best time.  Never too late.  I’ll write another week on compost piles – the slow, the soon and the real quick methods. You can also buy compost (bagged or by the pickup load or by the dump truck load) from folks like Soil Building Systems.

Organic matter – lots of it.  That’s number one.

Then there’s mulch.  Lots of it, too.  Mulch can be bagged stuff you get from the nursery, or delivered by the dump truck, or gathered yourself on the side of the street (read:  leaves in bags). You can also buy straw (not hay) to use as mulch.  Newspapers work, as does cardboard, spread around your plants and watered in well and then covered with leaves (watered in well also).

Leaves make excellent mulch.  Think of a forest floor and how the leaves carpet the ground, keeping it moist and soft, then deteriorating and becoming part of the soil.  Leaves are also free.

I should note here that if you get a dump truck load of mulch, you might want to invite some friends over to help you distribute it.  Here’s a picture of a mulch-spreading party this last weekend.

Mulch mountain

Mulch is magic.  It serves many purposes – first, it keeps weeds down (yay! less work!).  Second, it shades the soil so that the plants’ feet stay cool even in the hottest baking sun.  That means less water, because it prevents the soil from drying out.  And third, mulch condenses moisture from the air during the night, bringing more moisture to the soil and your plants.    (NOTE:  Do not use cedar bark mulch on vegetables – it’s best used in ornamental plantings.)

All that compost and mulch results in less watering needed to keep your garden going and producing.

In doing some calculations for a community garden’s rain water collection needs, I read that 100 sq. ft. of conventional vegetable garden needs 60 gal. a week at 60 degrees Fahrenheit.  Obviously as the temperature goes up, more water would be needed.  I couldn’t find any figures for how much mulch and organic matter reduce that, but I’ll bet it’s quite a bit – maybe as much as 50%.  Be kind to your water bill – and conserve.

In Part 2 (next week) I’ll talk about how we can build garden beds that require even less water.