Meditation on Bees

As the sun strikes the basil plant in bloom, it teems with life.  Stop and watch – honeybees, tiny native bees, butterflies, and an occasional bumble bee stop to sip the nectar of the tiny flowers.

Did you know that there are over 4000 species of native bee in North America, and over 800 in the Oklahoma/Texas blackland prairie?  They include leaf cutter bees, ground bees, mason bees, among so many others.  Honeybees (imported from Europe) are the only ones that produce honey.  The others are solitary and don’t live in hives – they may have colonies of several holes together, but they do not cooperate like the bees in a hive.  Each (female) bee finds nectar and pollen, puts them in a nest, lays her egg and seals it off, then repeats the process until her hole or nest is filled.  Then she dies.  Interestingly, the mason bee lays male eggs toward the last of her hole so that they emerge first and can wait around for the females to emerge to breed.  Most native bees do not sting.

A bit of trivia – mason bees can nest in small tubes about the size of a drinking straw.  You may have seen bee nests sold in nurseries – several hollow bamboo or other reeds bound together.  Because the nest is compact, commercial orchardists in California are now hiring mason bees for pollinating their crops (like almonds) because the beekeeper can put the nest in cool storage, and time the warming of it about 30 days before they want the bees to emerge.  Then, they place the nest in the middle of an orchard.  The honeybee can travel up to 2 miles, looking for nectar.  The mason bee only goes about ½ mile, so it pollinates the orchard more thoroughly and crop yields can increase by as much as 15%. 

When I visited Cozumel in early 2020, I was surprised to learn that they have a native bee that produces honey!  The bees build  their hives in logs, but the output is only as much as a liter of honey for a small log.  Therefore, the honey was very valuable and available only to the upper classes (to mix with cocoa powder and water for a rich chocolate drink!). 

Seeds Have Arrived!

The seeds for the spring garden (and beyond) have arrived!  To me, there is nothing more hopeful than seeds; they represent new life. Children, especially, seem to be excited by seeds.  I’ve watched as they sort through a basket laden with seed packets, dreaming and wanting to plant everything.

            Seeds represent dreams.  We can dream of the foods we will eat and the flowers that will bloom.  We can dream of the joy of planting the seeds, and cultivating them, to be rewarded with plants growing.

            So I share with you the hope that these seeds bring – of an abundant garden (no matter the size!).  Hope, which fills this Christmas season.   

I hope that your Christmas season is joyful and full of hope and dreams. 

How to Move a Garden

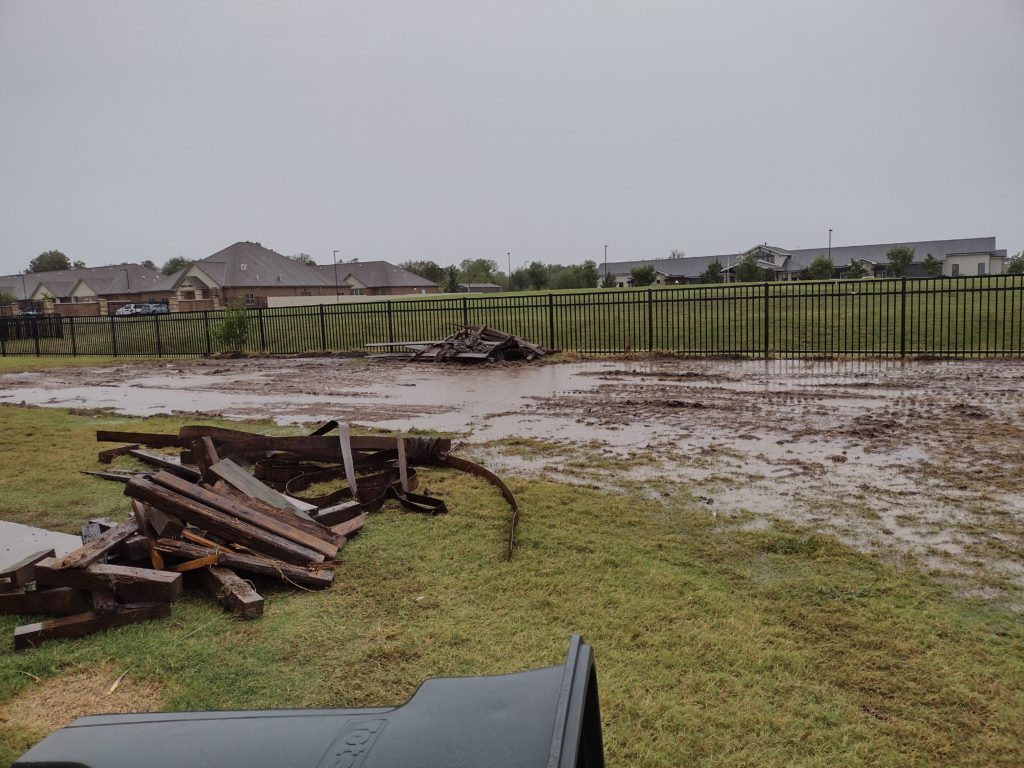
This past month has been occupied with moving a 750 sq ft garden from a site that is being converted to an access road. Although a permanent location is not solidified, nor is the design, the temporary arrangement is …. crates! About 110 sq ft of crates!

This was our garden … RIP

Milk crates (12″ cubes) are being used for the primary (new) crops, while vegetable crates (22″x14″x9″) are housing the asparagus crowns and the strawberries. Liners for the crates vary: the vegetable crates holding asparagus are lined with burlap bags, donated by a local coffee roaster. Since the burlap will deteriorate over time, when the asparagus needs to be transferred to its permanent bed, we can just lift the burlap and crowns as a whole and place in the bed, with minimum disturbance. When we moved the asparagus we carefully dug as far under the crowns as possible to minimize disturbing the roots. After a rain, they crowns have produced another crop of fronds. This is a good sign.

The strawberry crates are lined with net bags that housed onions for transport. Again, the strawberries were lifted with as much native soil as possible so that there was little shock. They have now been thinned and are mulched for the winter.

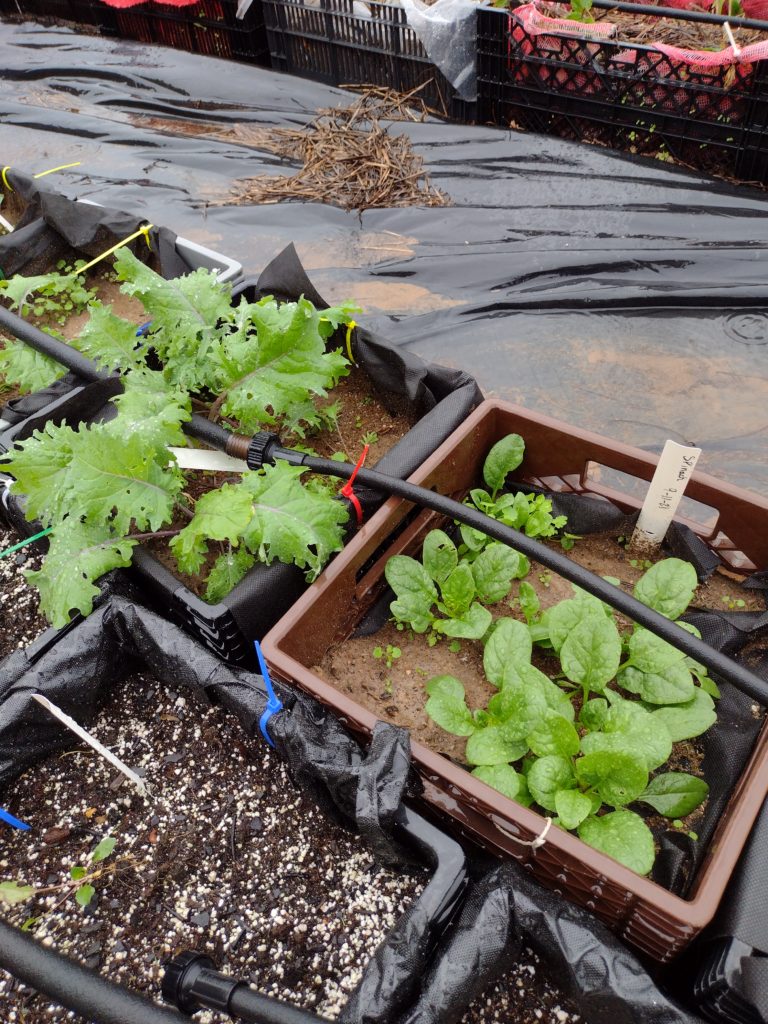
The milk crates are lined with weed barrier, to allow for drainage, but not allowing the soil to leak out. They are filled with soil from the garden and seeded with kale, spinach, carrots, turnips, arugula, and chicory greens. Take a look at the kale and spinach, thriving in the fall weather in its new home!

Thriving kale and spinach!

Now, as an aside, I’ll say that the milk crate garden idea comes from the Riverpark Farm NYC, which created and maintains a large farm solely in milk crates! And milk crates are so portable, that the farm has moved a couple of times since its inception. It’s a marvel.

So … here in Tulsa it can get quite cold. There is a plan. There are two methods that we used in the old garden beds:  mulching heavily and using row cover. The new, temporary, garden will receive those two treatments.

The asparagus already has been given a mulch of straw.  The mulch will insulate from temperature extremes, and will help the soil hold moisture when it rains (or we water).  When the spears turn yellow, we will cut them to about 1-2” and then mulch with about 3” of straw.  This should carry them through freezes.

 The strawberries are getting some light mulching, but as the freezes start we will be adding straw.  In February of this year, when the Great Freeze happened, we completely covered the plants with straw.  When the weather began to warm again, we pulled it aside and the little green leaves perked up.

As for the rest of the crates, we’ll be creating a microclimate.  That means modifying the environment around the crates to lessen the impact of extreme weather.  In the next few weeks, bales of straw will be placed on the north side of the milk crates.  The straw will protect the crates from north winds.  Then the crates will also be sporting hoops to support row cover.  The row cover will also lessen the impact of weather extremes.  And, if it snows or ices, the snow/ice will settle on the row cover and become insulation! 

Weeds Have Jobs – #6

Purslane, an edible green

Purslane (Portulaca oleracea) is a succulent that comes in many varieties, and the one usually found in the garden or driveway has small leaves, spreading close to the ground.  It has a cousin that has larger leaves, but still has a spreading aspect, and is found in the produce department of Latin markets under the name Verdolaga. Its used both raw in salads and cooked, as greens.

This “weed” can be found often growing in cracks in driveways, or along a hard-packed garden path.  It’ll also find its way into a garden bed with dense, clay soil.  It is drought tolerant and  grows in full sun as well as part shade.  Purslane is also attractive to bees. It grows where there is little humus and low moisture, as well as low calcium and phosphorous. As such, it is considered a “dynamic accumulator,” pulling in calcium and phosphorous from deeper in the soil via a long taproot, to make the minerals available to other plants. It can also indicate very high potassium and magnesium in the soil. 

Purslane growing amidst straw mulch in garden bed

Weeds Have Jobs – #5

Our weed this time is a much maligned weed that is actually a good food that foragers look for!

Chenopodium albus (Lambs quarters)

The name, Chenopodium, refers to the shape of the leaves – “goose foot.”  Lambs quarters grows where there is very low calcium and phosphorus, very high potassium and magnesium, high sulfur and copper, low humus, good drainage of the soil.

Lambs quarters is another edible, and is in the amaranth family of plants; the seeds are gathered and used similar to quinoa (a relative).  It is wind-pollinated and so it does not have showy flowers to attract pollinators.  But it is a food source for various insects, caterpillars and wildlife. It can grow to be nearly 2 feet tall, and is often removed from vegetable beds because it is considered a “weed.”

Recognize it? Now you know it’s not a weed, but can be an indicator of soil needs and a source of food.

Weeds Have Jobs #4

Stellaria media (common chickweed)

Chickweed grows where there is a need for calcium, phosphorus, potassium, and manganese in the soil.  It also indicates that the soil has high levels of magnesium and iron, and high sulfur and copper in the soil.  It indicates that there is low porosity (the soil is tight). 

Chickweed is another edible and is in the carnation family of plants.  It also has a history as a medicinal herb for a variety of ailments.  As the name implies, chickens like it.

The flowers are small, and star-like.  It is a plant that attracts trichogramma wasps, that prey on tomato hornworms – a great natural insect predator for the garden!

Stellaria media – common chickweed

Weeds Have Jobs #3

Continuing our conversation about weeds I’m finding in my garden beds in Tulsa, Oklahoma…..

Lamium amplexicaule (henbit) is common and easy to identify.

This plant tells us the soil is low in calcium, has low porosity, low humus, and low bacteria. It can also indicate poor drainage and sandy soil (the two go together because sand doesn’t hold water very well!). Its job is to provide erosion control by its roots. It likes moist soil and often is in shady places.
Henbit is edible and was brought to the Americas for chickens to eat. But wild food foragers say you can eat all of the plant. It’s a member of the mint family, and has lovely purple flowers that bees love.

If you want to read more about weeds and their jobs, I love two great references: John Beeby’s Test Your Soil with Plants (Willits, CA: Ecology Action, 2013); and Jay McCaman’s Weeds and Why They Grow (Sand Lake, MI: Jay McCaman, 1994.

Weeds Have Jobs #2

This week we’ll talk about spurges, also called sandmats. There are two types that seem to be prevalent in the gardens I’m tending in Tulsa, Oklahoma. The first, Euphorbia maculata, with purple spots on the leaves.

Spurge – Euphorbia maculata

The second is Euphorbia prostrata, that tends to have a spreading, spiderlike, form.

Euphorbia prostrata

The third type is the Euphorbia serpens, or creeping spurge.

Euphorbia serpens

So what is this about spurges? What are they all about and why do they grow where they are? In other words, what is their job?

Euphorbias are prostrate and spread.  They can have a taproot up to 2 feet.  They are not edible (and are toxic – the milky latex sap contains diterpene estersin, which can be irritating to the skin). 

Spurges tell us that the soil is clay, loam, and sand. Which can be good. But …

Generally spurges indicate low calcium, very low phosphorus, very high potassium and magnesium, high sulfur, high copper, and a hard layer in the soil (thus the long taproot to break up the soil).  They also grow where there is poor drainage, which is a symptom of a hard soil layer.

So when you see a lot of spurges in your garden or in your lawn, think about having the soil tested for mineral content, and dig down a bit to see if there is a hard layer just under the top soil.

Want to read more? My favorite references are John Beeby’s Test Your Soil with Plants (Willits, CA: Ecology Action, 2013); and Jay McCaman’s Weeds and Why They Grow (Sand Lake, MI: Jay McCaman, 1994.

Keyhole Garden Build

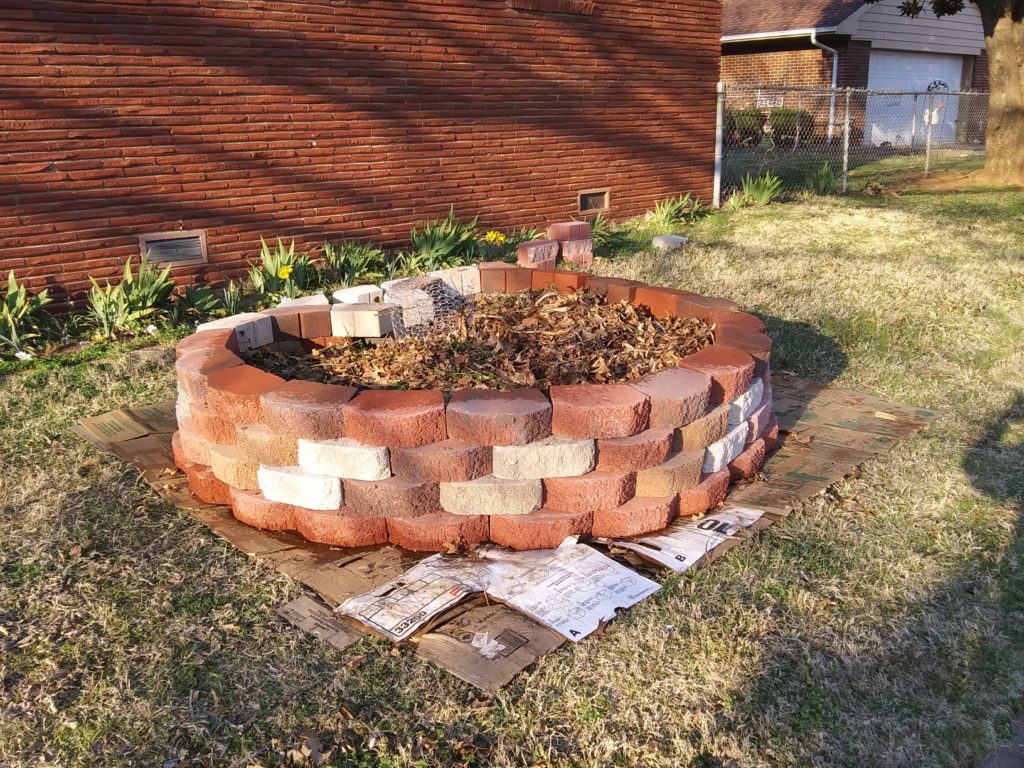
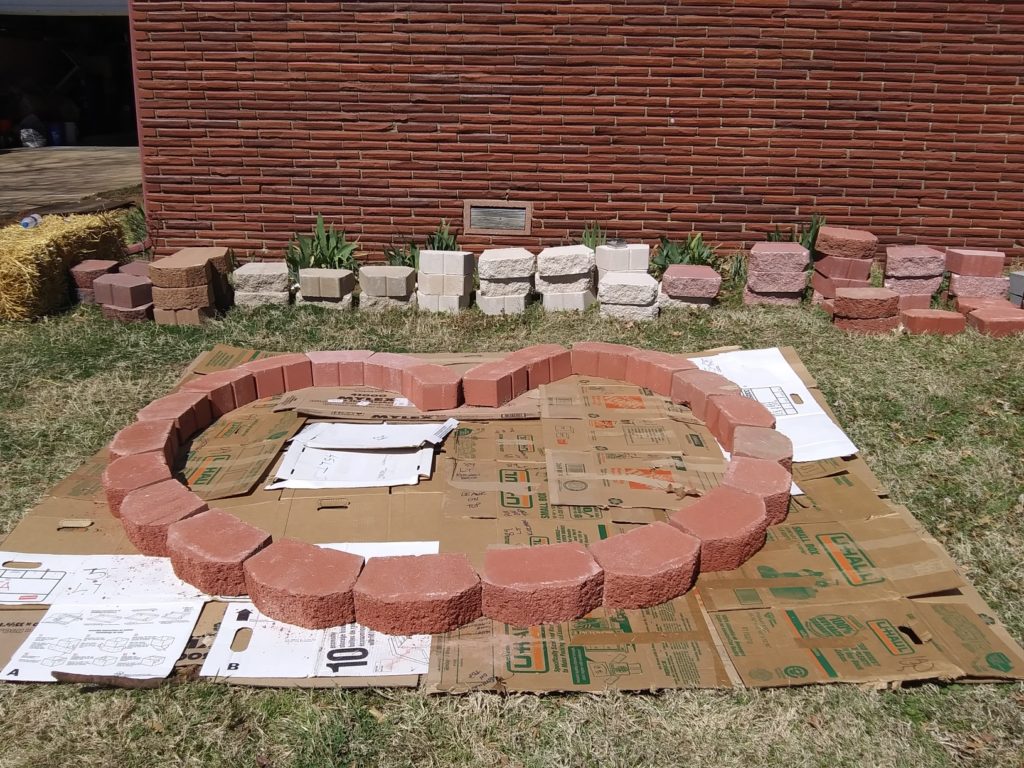
Keyhole Garden partially filled

This week’s project was a keyhole garden. It is modeled after a design created several years ago by a nonprofit organization, Send a Cow, to help families in arid regions of Africa. The design is basically a raised bed with a compost pile in the middle. It holds water because of all the organic matter with which it is filled, and allows greater density of planting because of the richness of the soil.

I learned how to make raised bed keyhole gardens when I attended a workshop taught by Dr. Deb Tolman, an environmental scientist, and a strong advocate for this type of bed.

First, I accumulated 92 landscape blocks, the ones used to build retaining walls. They are more attractive than concrete blocks that can be used. However, this bed will be out in front of my house, so I want it to be attractive. Otherwise, concrete blocks can be painted for aesthetic purposes.

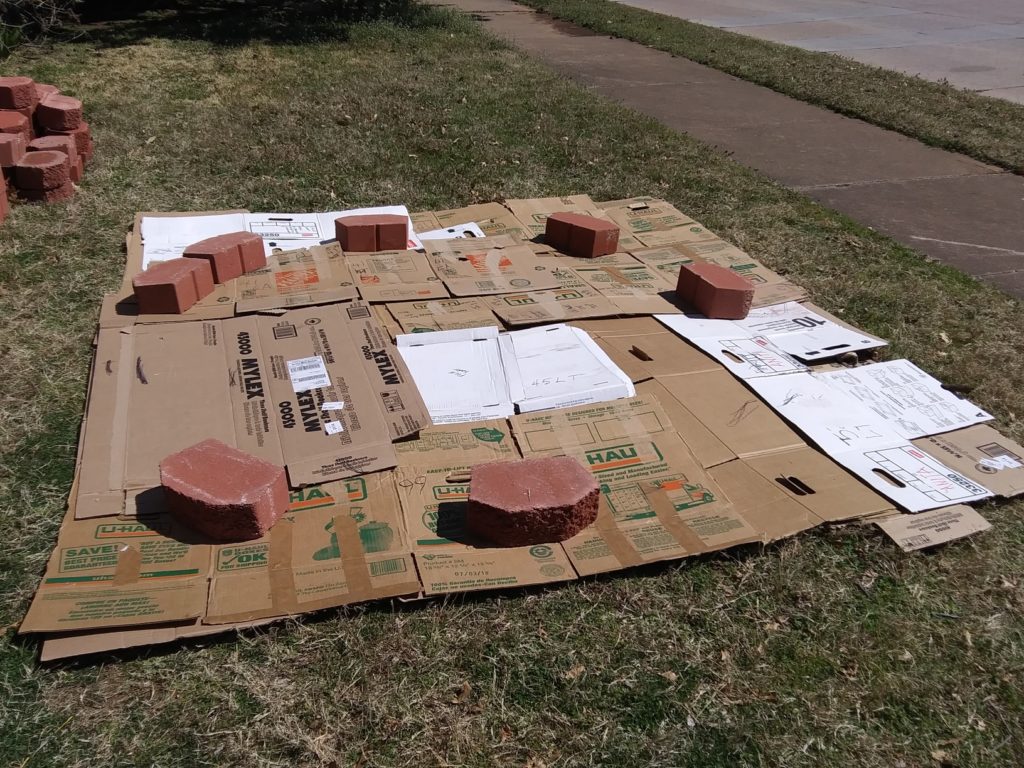
I had plenty of cardboard from boxes I’d used in moving. I removed tape, and burst them into single sheets. I then laid them in a roughly 8′ x 8′ square, with cardboard overlapping by 6″ and then doubled that thickness with another layer of cardboard. On the cardboard, I marked out a 6′ diameter circle, and started placing blocks around on the marks.

Cardboard laid, circle marked, and setting out blocks

I adjusted the blocks around the circle, and aligned the “v” that makes it a keyhole.

First, base round laid out

It is critical to layout the first round carefully, because all subsequent rounds are based on the base round. The second round is placed off-center block by block of the first round. The picture at the top of this blog post is the finished wall. Note that a cylinder of wire (chicken wire or hardware cloth) with a diameter of approximately 18″ is placed upright at the apex of the “V”. This wire cylinder is to contain compostable materials on an ongoing basis.

Watering is done through the cylinder once the garden is filled and planted. In this way, the water goes through the compost and out to the plant roots. The dimensions of the garden (maximum 6′ in diameter) is the maximum distance that the water will migrate out to the plants. Note also that the cylinder is at the center of the circle.

The garden is now being filled by (1) branches and cuttings from bushes on the property; (2) leaves collected from curbs in the neighborhood; (3) wood chips; (4) turf removed when I planted trees; (5) vegetable matter that my neighbor removed when cleaning out her flower beds; and (6) some compost. I will continue to fill the bed, letting rain pack down the contents, adding some dog hair from my folks’ dog brushings, more compost, more leaves, straw, wood chips, and finally a layer of compost and top soil to bring it ready to plant – projected around May 1.

Stay tuned for progress reports!

Beginning Gardening Series – Water Part I

A plant needs sun, soil, water, and air.  We’ve covered sun in the last installment.  Now let’s talk about water.

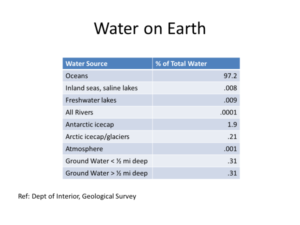
Water is a precious resource.  Below is a graph courtesy of the Department of the Interior, Geological Survey.  If you’ll note the last two lines, only .31% of fresh water is ground water less than 1/2 mile deep.  That’s all the water we are working with !
There are two sources of water for your garden – the tap and rainwater.

Tap Water

Water piped to your property by the city or municipality is the main source of water for home and community gardeners.  There is some concern about the chlorine in tap water, because chlorine can be toxic and kill off some of the micro-organisms in the soil.  Plants do grow better and soil is healthier with fresh rainwater.  Although you can have a thriving backyard or community garden watered by tap water, if this is an issue that concerns you greatly, there are filters that can be installed on the tap or on the garden hose to filter out chlorine. RV stores carry them, as well as major retailers.  They vary in cost from $37 to $100.  It depends on your budget.  A good brand appears to be Gard’n Grow that is made for attaching to a garden hose. An internet search can give you a variety of choices.

Rainwater

Rain is the best water source for your garden.  Capturing rainwater from roofs entails use of gutters, downspouts, and rain barrels or cisterns.  Depending on what you have available already (e.g., gutters and downspouts), installation of rain collection can be budget-friendly or expensive.  There are adapter kits available at the hardware store to divert rainwater from existing downspouts, into food grade (NOTE:  must be food grade) barrels which can be obtained online or through municipal water collections classes.  A rule of thumb is that a one-inch rain will deliver .6 gallons (that’s 6/10ths)/square foot of roof to your collection point.  So, a 2000 sq. ft. roof would be expected to give you 1200 gallons of runoff in a one-inch rain event.  A 50-gallon drum would be overflowing in a heartbeat.  So plan storage accordingly.  When I attended a class at Texas A&M AgriLife Extension, we were told to plan capacity to hold water equivalent to usage for 30 or more days, depending on the longest average time without rain in our area.

Another way of capturing rain, called “harvesting rain,” is through building soil with organic matter, creating rainwater diversion channels, and use of mulch.  We’ll talk about these methods of harvesting rain in the next module, which will deal with soil building.

Conservation of Water

Whichever way you plan to water your garden, conservation of water is important.  The way in which you water your garden can play a big role in the amount of water you use.

              Rows and Ditches

The old way of planting a garden has been to form raised rows, divided by ditches, through which water flows.  Although it gets water to the root of the plants, a lot of water is evaporated before the water can soak into the soil.

             Hand Watering or Sprinklers

This method is with a hose and spraying by hand.  It is time and labor intensive, and water tends to evaporate on the journey from hose end to ground.  In addition, some plants prefer to be watered at the ground level.  If you hand water, bear in mind that the best time to water is in the morning, to allow moisture on leaves to evaporate during the day.  If you water in the evening, some water stays on leaves, and on the top of the ground, and can promote disease and attract pests.

Watering with sprinklers is similar to watering by hand.  There is lots of water evaporation between sprinkler and plant/ground contact.

            Drip Irrigation

Drip irrigation delivers water at a slow rate, directly to plant roots.  This is the preferred way to water plants.  The slow rate of delivery allows water to soak in rather than puddling around the plants.  Drip irrigation kits complete with hoses and emitters can be purchased at hardware stores.  They can be as elaborate or expensive as you want.

I tend to favor a ½” porous hose, called a drip soaker, which can be purchased at hardware stores.  They last me about 2-3 years before the sun deteriorates them and I have to replace them. The soakers come in varying lengths.  I usually get a long one, with some hose coupling hardware, and then cut the hose into the lengths I need for whatever garden I’m irrigating.  I use “Y” couplings for adjacent beds, and can direct flow to one or the other or both beds at will.

What’s Ahead

In our next post, we’ll continue discussion of watering methods – highlighting the “olla.”  Stay tuned ….