How to Move a Garden

This past month has been occupied with moving a 750 sq ft garden from a site that is being converted to an access road. Although a permanent location is not solidified, nor is the design, the temporary arrangement is …. crates! About 110 sq ft of crates!
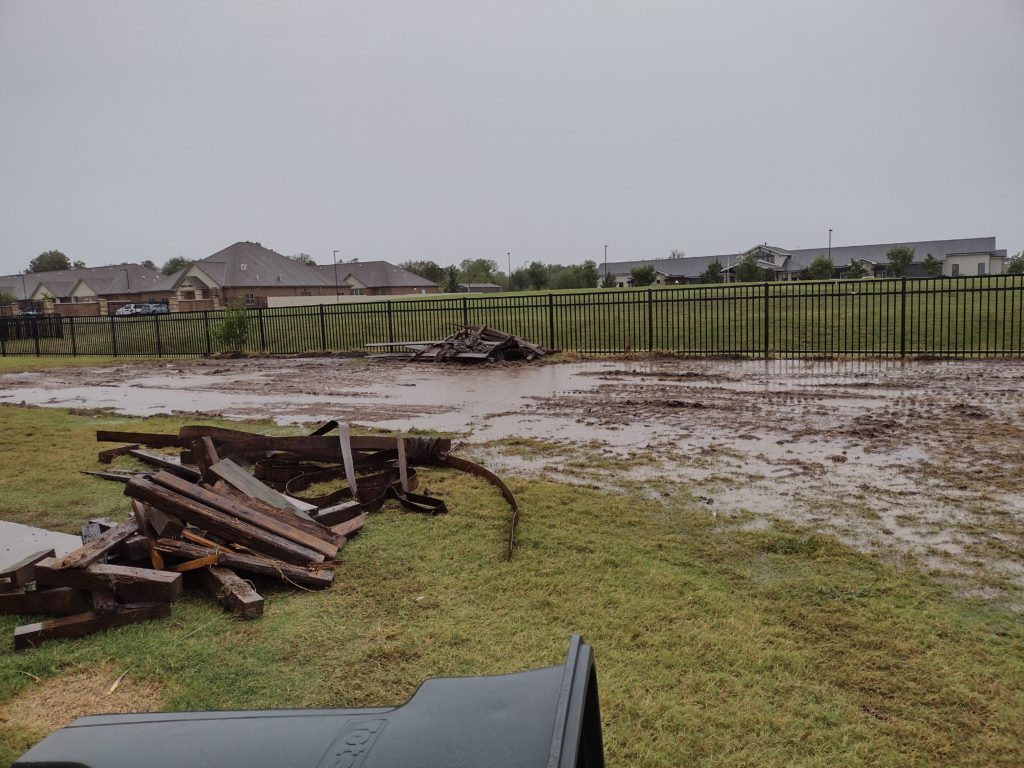
This was our garden … RIP

Milk crates (12″ cubes) are being used for the primary (new) crops, while vegetable crates (22″x14″x9″) are housing the asparagus crowns and the strawberries. Liners for the crates vary: the vegetable crates holding asparagus are lined with burlap bags, donated by a local coffee roaster. Since the burlap will deteriorate over time, when the asparagus needs to be transferred to its permanent bed, we can just lift the burlap and crowns as a whole and place in the bed, with minimum disturbance. When we moved the asparagus we carefully dug as far under the crowns as possible to minimize disturbing the roots. After a rain, they crowns have produced another crop of fronds. This is a good sign.

The strawberry crates are lined with net bags that housed onions for transport. Again, the strawberries were lifted with as much native soil as possible so that there was little shock. They have now been thinned and are mulched for the winter.

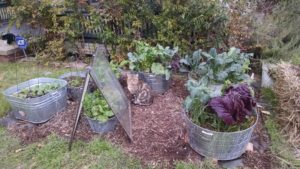
The milk crates are lined with weed barrier, to allow for drainage, but not allowing the soil to leak out. They are filled with soil from the garden and seeded with kale, spinach, carrots, turnips, arugula, and chicory greens. Take a look at the kale and spinach, thriving in the fall weather in its new home!
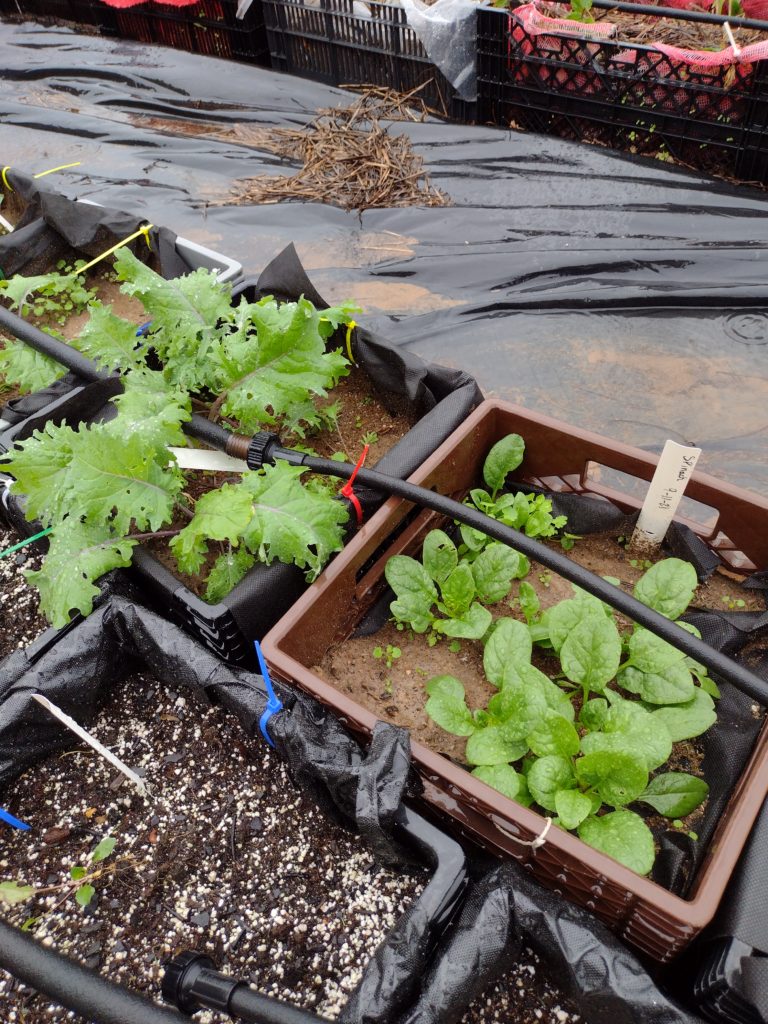
Thriving kale and spinach!

Now, as an aside, I’ll say that the milk crate garden idea comes from the Riverpark Farm NYC, which created and maintains a large farm solely in milk crates! And milk crates are so portable, that the farm has moved a couple of times since its inception. It’s a marvel.

So … here in Tulsa it can get quite cold. There is a plan. There are two methods that we used in the old garden beds:  mulching heavily and using row cover. The new, temporary, garden will receive those two treatments.

The asparagus already has been given a mulch of straw.  The mulch will insulate from temperature extremes, and will help the soil hold moisture when it rains (or we water).  When the spears turn yellow, we will cut them to about 1-2” and then mulch with about 3” of straw.  This should carry them through freezes.

 The strawberries are getting some light mulching, but as the freezes start we will be adding straw.  In February of this year, when the Great Freeze happened, we completely covered the plants with straw.  When the weather began to warm again, we pulled it aside and the little green leaves perked up.

As for the rest of the crates, we’ll be creating a microclimate.  That means modifying the environment around the crates to lessen the impact of extreme weather.  In the next few weeks, bales of straw will be placed on the north side of the milk crates.  The straw will protect the crates from north winds.  Then the crates will also be sporting hoops to support row cover.  The row cover will also lessen the impact of weather extremes.  And, if it snows or ices, the snow/ice will settle on the row cover and become insulation! 

Beginning Gardening Series – Water Part I

A plant needs sun, soil, water, and air.  We’ve covered sun in the last installment.  Now let’s talk about water.

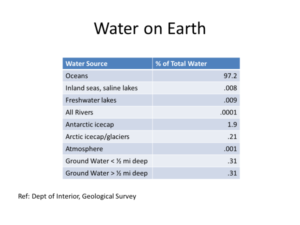
Water is a precious resource.  Below is a graph courtesy of the Department of the Interior, Geological Survey.  If you’ll note the last two lines, only .31% of fresh water is ground water less than 1/2 mile deep.  That’s all the water we are working with !

There are two sources of water for your garden – the tap and rainwater.

Tap Water

Water piped to your property by the city or municipality is the main source of water for home and community gardeners.  There is some concern about the chlorine in tap water, because chlorine can be toxic and kill off some of the micro-organisms in the soil.  Plants do grow better and soil is healthier with fresh rainwater.  Although you can have a thriving backyard or community garden watered by tap water, if this is an issue that concerns you greatly, there are filters that can be installed on the tap or on the garden hose to filter out chlorine. RV stores carry them, as well as major retailers.  They vary in cost from $37 to $100.  It depends on your budget.  A good brand appears to be Gard’n Grow that is made for attaching to a garden hose. An internet search can give you a variety of choices.

Rainwater

Rain is the best water source for your garden.  Capturing rainwater from roofs entails use of gutters, downspouts, and rain barrels or cisterns.  Depending on what you have available already (e.g., gutters and downspouts), installation of rain collection can be budget-friendly or expensive.  There are adapter kits available at the hardware store to divert rainwater from existing downspouts, into food grade (NOTE:  must be food grade) barrels which can be obtained online or through municipal water collections classes.  A rule of thumb is that a one-inch rain will deliver .6 gallons (that’s 6/10ths)/square foot of roof to your collection point.  So, a 2000 sq. ft. roof would be expected to give you 1200 gallons of runoff in a one-inch rain event.  A 50-gallon drum would be overflowing in a heartbeat.  So plan storage accordingly.  When I attended a class at Texas A&M AgriLife Extension, we were told to plan capacity to hold water equivalent to usage for 30 or more days, depending on the longest average time without rain in our area.

Another way of capturing rain, called “harvesting rain,” is through building soil with organic matter, creating rainwater diversion channels, and use of mulch.  We’ll talk about these methods of harvesting rain in the next module, which will deal with soil building.

Conservation of Water

Whichever way you plan to water your garden, conservation of water is important.  The way in which you water your garden can play a big role in the amount of water you use.

              Rows and Ditches

The old way of planting a garden has been to form raised rows, divided by ditches, through which water flows.  Although it gets water to the root of the plants, a lot of water is evaporated before the water can soak into the soil.

             Hand Watering or Sprinklers

This method is with a hose and spraying by hand.  It is time and labor intensive, and water tends to evaporate on the journey from hose end to ground.  In addition, some plants prefer to be watered at the ground level.  If you hand water, bear in mind that the best time to water is in the morning, to allow moisture on leaves to evaporate during the day.  If you water in the evening, some water stays on leaves, and on the top of the ground, and can promote disease and attract pests.

Watering with sprinklers is similar to watering by hand.  There is lots of water evaporation between sprinkler and plant/ground contact.

            Drip Irrigation

Drip irrigation delivers water at a slow rate, directly to plant roots.  This is the preferred way to water plants.  The slow rate of delivery allows water to soak in rather than puddling around the plants.  Drip irrigation kits complete with hoses and emitters can be purchased at hardware stores.  They can be as elaborate or expensive as you want.

I tend to favor a ½” porous hose, called a drip soaker, which can be purchased at hardware stores.  They last me about 2-3 years before the sun deteriorates them and I have to replace them. The soakers come in varying lengths.  I usually get a long one, with some hose coupling hardware, and then cut the hose into the lengths I need for whatever garden I’m irrigating.  I use “Y” couplings for adjacent beds, and can direct flow to one or the other or both beds at will.

What’s Ahead

In our next post, we’ll continue discussion of watering methods – highlighting the “olla.”  Stay tuned ….


What Can I Plant Mid- to Late-March in Dallas?

Getting the itch to really garden with the great sunny days?  Here’s a guide to what you can plant now and for the next 2-3 weeks.

It’s still not too late to seed in

collards
lettuces (look especially for the heat resistant varieties if you want to lettuce to last longer)
spinach
radishes
mustard
turnips
Swiss chard

Late March (depending on our having received our last freeze – usually mid-March), you can seed in:

Beans – all types
Corn
Cucumber
Malabar Spinach (a climber, but beautiful!)
Purslane
Cantaloupe
Water melon
Summer Squash
Winter Squash (acorn, butternut)

And you can start setting in those transplants for tomatoes!  Wait a bit on the peppers till after April 1.

Container Gardening Class!

March 10, 1 pm at Trinity Haymarket (1715 Market Center Blvd).


Containers are solutions to:  no sunlight in backyard or place for a garden; rented digs when you don’t want to dig up a landlord’s ground; mobile – you can take your garden with you!; and…. you can create a wonderful soil for just about any plant.  Few limits to what you can plant in your containers – depending on the size.

We’ll talk about how you can repurpose all sorts of containers to garden in the space you have. Subjects will cover large containers as well as small, and special considerations associated with container gardening. We’ll also cover what plants go best in containers and discuss planting mixes.

Join us for a fun and creative session!

Container Hugelkultur – its possible!

A few weeks ago I was asked to assist build-out of a garden in 10 horse troughs – the 8′ long, 3′ wide and 3′ deep galvanized type.  Here’s how we did it on the low budget side with maximum soil building and micro-organism habitat that is high in organic matter…. with hugelkultur!

First, we drilled holes along the bottom of all sides – 1/2″ holes about 12-18″ apart about 2″ up from the bottom.  This is for drainage.  Otherwise, we’d have a bathtub marsh and vegetables and herbs just don’t grow well in marshes.

The containers had water lines already set and coming in from the bottom.  These had to be held upright so that we could connect drip irrigation at the top when the containers were filled.  We duct-taped the lines to a stick used as a cross piece.

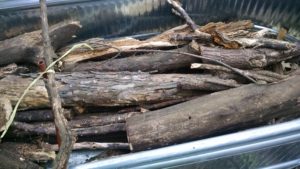
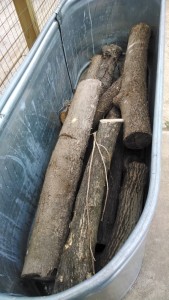
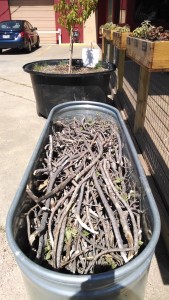
Next, we added logs and branches, cut to about 3′ lengths.  This filled in the bottom foot or so.  The wood was collected from an urban forest – it was downed wood, that was older – the best!  The wood will decompose, forming a wonderful habitat for micro-organisms, while also becoming spongy and thus holding water.

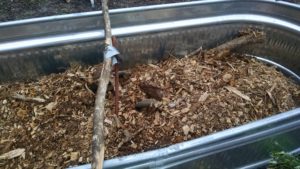
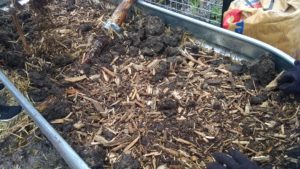
Then we needed to fill in the spaces between the logs – what better material than wood chips?!

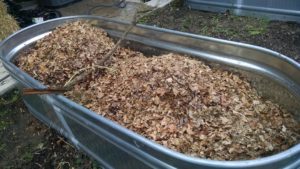
We were generous with the wood chips, and then put in lots of leaves, which were watered in well.

We knew the containers were draining well when we watered in the leaves – all the leaves needed to be moistened, just like in a compost pile – because water drained out the bottom of the containers into the walkways.  These became a bit muddy, so we added woodchips to soak up the moisture.

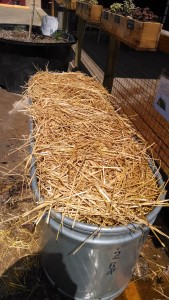
Our next step was to add more woodchips.  We watered again.  We added straw.

We noticed that a bobcat was leveling a site across the way from us, and the dirt it was removing didn’t look like black clay.  We went over to investigate, and the soil was mixed with woodchips – that had been put down on the site a year or so before.  We convinced the bobcat operator to share some of this woodchip loaded soil with us.  And we added it to the mix – it helped us innoculate the beds with native micro-organisms.

You can see that we are filling up the bins nicely.  Once again, we watered the bins to help compact the straw.  We had been working about an hour and a half (it went quickly with about 10 people working), and took a break while we waited for the top soil to arrive.

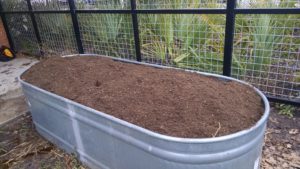
This was the only expense – 10 cu. yds. of organic top soil. The rest of the materials were scavenged or delivered free (ever wonder what tree trimming services do with the limbs they chip –  often they have to pay to dump them so they are very happy to provide free chips to folks in their area), or leaves nicely bagged and left at the curb for picking up by anyone.

The top soil then was used to top up all the bins.  Doesn’t this look luscious and ready to plant?  But wait!  We need to add a couple of things to help these garden beds along – my favorite trio of Azomite (pelletized volcanic ash that provides essential and trace minerals to the soil), Wildroot mycorrhizal fungi to help the plant roots access nutrients in the soil, and worm castings (one of the best sources of bacteria for the soil ecology as well as fertilizer).

All that is needed is to set the top drip irrigation lines, and plant!

These beds will not need as much water as other raised beds because of the hugelkultur construction.  They will sink down as the organic matter decomposes – just like a compost pile – but then all one needs to do is add mulch and/or compost on top with every planting season.


Gardening During Drought – Part 2

In Part 1 we covered ways in which you can use compost and mulch in an existing garden bed to reduce water usage.

Now we will tackle a way to set up the garden bed to reduce water needs from the get-go!

hugelkultur bed

I’ve talked about the method before – it’s called Hugelkultur, and it hails from Eastern Europe.  Hugelkultur has been used for centuries, but it’s only become more popular after the publishing of  Sepp Holzer’s Permaculture.

Hugelkultur works to conserve in two ways:  Not only does the technique use all those trimmings from yard waste that go to the landfill, but the whole bed acts as a water sponge.

That certainly works well with water restrictions in North Texas communities and reduces water bills. I’m going to repeat what I have written before – a 100 sq. ft. bed planted in vegetables is expected to need 60 gallons of water weekly – at least.

I would love to see hugelkultur used in setting up school gardens.  The reason is that school gardens are often promised water from the district for only the first year – after that, the garden manager has to devise other ways of providing water – usually rain capture. But reducing water needs is critical, whether the district pays the bill or rain is borrowed.

Basically, hugelkultur copies what we find in a forest floor – dead and rotting trees, covered with limbs that fall, then by leaves which decompose and we have a soft, cushiony bed in which all sorts of life thrives.

Here’s what happens:  the logs (old or new) rot and become porous. They serve as excellent habitat for mycorrhizal  fungi, which are essentially for healthy plants.  AND, as the wood rots, it acts as a sponge for water.


The end result is that hugelkultur beds don’t need to be watered nearly as often.  I talked to a community garden manager last year, asking about the experimental bed she had put in.  She stated that in October they had built the bed, planted broccoli, cauliflower and cabbage and – when I talked with her in February – they had still not watered since the bed was planted!

Hugel container logs

Traditionally, the hugelkultur process starts with a trench in which logs are placed, then twigs, then leaves, then compost and soil on top.  It can be anywhere from a foot high to several feet. It all depends on where you live, what you want to put into it, and how high you want it to go. You can even install a hugelkultur bed for ornamentals that your HOA will approve of – just start with a trench and only go as high as 12” for the mound.  Many front yard plantings go that high with mulch on top.

Hugel container sticks

The bed doesn’t have to be in-ground either.  Hugelkultur can be built on the ground, or in a container.

Hugel container straw

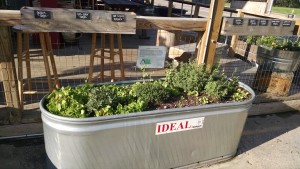
One garden I built was in a horse trough – I drilled ½” drainage holes about 8” apart on the sides of the trough. Then filled with logs, sticks, and straw, and covered with a layer of compost and planted herbs.

Hugel planted

I read online about a lady who takes muck tubs (they are the large plastic tubs with plastic rope handles often seen in barns for hauling…muck…), puts holes in the bottom and puts a short log upright in the tub.  She then drills holes in the upper end of the log (to encourage water to go into the log), fills with leaves and compost and tops with soil.  Then she plants.  She says at the end of the season, after having reduced the water needs in her muck tub containers, her plants have grown their roots around the log.  I’m going to have to try this I think this winter!

We adapted hugelkultur last month, when we built a formal keyhole garden. The home owner had trimmed crape myrtles and was about to put them out on the street for pick up.  We put those trimmings in the bottom of the keyhole garden, along with leaves, cardboard, dryer lint, straw, compost and then top soil and mulch. The garden will be a compost pile with hugelkultur overtones…a mixing of two incredible water-holding, nutrient-rich planting environments.

One caveat – the garden bed will decrease in height over time, so just keep adding mulch and compost on top. And you’ll have the richest, softest, best water-holding beds imaginable.

Be creative.  Use the concept and let me know how you have used this technique that mimicks the forest floor.

Gardeners….It’s Seed Ordering Time!

The garden catalogs are arriving in my mailbox, and I scan the pages, dreaming of wonderful plants for the spring, summer and fall.  The neat thing is that I get the paper catalog (okay, I’m a throw-back and love to touch it, see it, and feel it), but I can order online! Best of both possible worlds.

Seed catalogs

My favorite seed companies each have a unique offering.

The Southern Exposure Seed Exchange (www.southernexposure.com) is located in Virginia, so I can be assured that the varieties they offer are probably going to work in Texas. I love reading the descriptions of their offerings.  All seeds are coded for those best suited for the Southeast, heirloom, ecologically grown and USDA certified organic.   The heirloom varieties often have an indication of when they were “discovered” and where they originated.  For example, “Fish Pepper…African-American heirloom from MD.” or for carrots…”Chantenay Red Core…introduced from France in the late 1800s.” or “Cosmic Purple…yellow and purple carrots were first recorded in Asia Minor in the 10th c. For the first few hundred years of managed cultivation, carrots were predominantly purple.”  Wow!  A history lesson along with descriptions.  SESE also carries grains and cover crops:  want sesame? hairy vetch? red clover, sorghum and broom corn?  They have seeds!

Baker Creek Heirloom Seeds (www.rareseeds.com) perhaps has the most extensive catalog – it’s almost like a thin book!  Baker Creek is located in Mansfield, MO, so I can be assured that I can find varieties that will work well in Texas. They carry vegetables, herbs and flowers. I can also get flax if I care to try growing fiber crops.  The pictures are incredible.  One eggplant that caught my eye was the Turkish Orange. It’s described as coming from Turkey. “The 3” round fruit are best cooked when they are green to light orange.”

Botanical Interests (www.botanicalinterests.com) is located in Colorado.  But it has some very interesting varieties and a wonderful selection (3 varieties) of Texas Bluebonnets in their flower section. I think one of the heirlooms I’m going to try this year is the Scabiosa Pincushion Flower. It’s described as “Perennial. Blooms summer through fall.” Sounds wonderful with blue-purple and white flowers. On the peppers page, I learned that peppers have been around since 7500 BC and are cultivated around the world. Columbus brought the spicy pods back to Spain and about 50 years later “they were being grown throughout Europe, the Mediterranean, the Middle East, Asia and the African coast.”  The selections are not quite as extensive as offered from some of the other seed merchants, but there are good, solid varieties.


The Landreth Seed Company, “purveyors of find seed since 1784,” is based in Pennsylvania (www.landrethseeds.com). Their catalog has the look of an heirloom.  They even have a section specifically for a children’s garden. Vegetables offered are selected for their interest, such as purple plum radishes, African mini-bottle gourd, and Mexican sour gherkin.  All varieties that are selected for their potential attractiveness to children. One section highlights varieties best suited for a patio/container garden.

The Pinetree garden seed catalog (www.superseeds.com) is a new one for me this year. Pinetree is located in Maine, so I will look through it to locate varieties that may be experimental for me.  They also offer loose tea, such as “Nilgiri – organic, fair trade certified.” They offer culinary herbs, medicinal herbs and dyeing herbs as well as tobaccos for the gardening.  I may try out the Hopi Red Dye Amaranth this year, since I’d really like to try dyeing some of my wool with reds.  Pinetree was my source for the Bhut Jolokia (Ghost Pepper) seeds. It is described as “A legendary variety from India with its extreme heat, said to be one of the hottest pepper[s] in the world with a Scoville rating over 1 million units.”  They take about twice as long as other peppers to mature.  But my youngest daughter and her husband like to try extreme peppers, so this was a good choice for them to try.  Note:  only 20 seeds are in each packet!

It’s a good idea to order seeds (at least for spring) soon, because if a transplant goes in mid-March, but is started indoors 8-10 weeks before planting, that means January is the time to start those seeds!

We’ll talk more about starting seeds in the coming weeks.

Protecting Plants in the Freeze

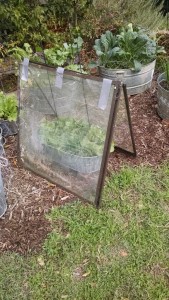
The day before the expected first freeze of the season, I watered all the plants in my container garden deeply, to keep them warm through the possible freezing night.  I was most concerned about my lettuce, which makes wonderful salads.  After brainstorming with a friend, I retrieved two panes left from an old storm door that had been sitting the back yard since forever.  With a little duct tape, I managed an a-frame greenhouse arrangement over the bed. When I checked the lettuce this morning, it was still perky and actually felt a bit warmer to the touch than the other, uncovered greens.  Of course, I expect the mustard, kale and chard to weather the freezing temperatures well.  I have had chard covered in ice which I watered and it came back.  In fact, I have had a chard plant last 2.5 years before I became tired of it in the spot and took it out!  I’ve heard of one lady who had a plant that was 5 years old.  So the lesson is, plant chard where you want it to thrive for a while and keep it watered.

Beautiful Weather for Gardening

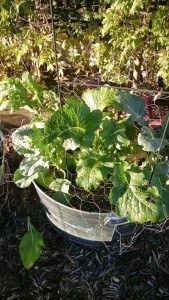
Greens-2Bin-2Btub-2B110714
This week I worked on my own container garden, thinning the kale, mustard and chard to make room for a few plants to truly take off.  I added azomite as well as worm castings before planting. 
Azomite provides multiple trace minerals (they say as many as 70!) that have been leached from our soils over the years.  That’s one reason our food is less nutritious than it was 50 years ago. 
And it’s another reason to garden organically.  What goes into the soil, goes into the plants, and goes into our bodies.  Our bodies also need these trace minerals.  Okay, I’ll step off my soapbox now.
I did have a wonderful greens supper the night of the thinning, cooking my mustard and kale greens with olive oil and garlic.
 
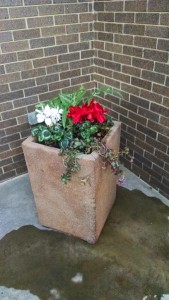
Entrance-2Bpot-2B110614
Another fun activity this week was planting a client’s ornamental pots, strewn about his pool area as well as his front entrance.  It’s a modern house with a magnificent view. 
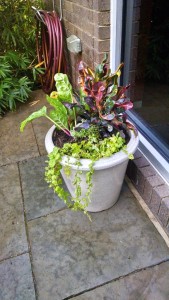
He wanted color for the winter.  I chose cyclamens (rose, pink, red) as well as crotons (interesting veins of red, deep green, light green and gold), moneywort for ground cover and dripping from pots, cardoon (beautifully spiky for a variety of texture; this plant will grow larger), alyssum (for fragrance and some low level white contrast) and sedum (this variety has a purplish green leaf and is a ground cover that is also dripping over the edge of the pot). 
I even threw in a couple of chard plants!  Those will also grow larger, although they are hidden now.  I just can’t resist putting in an edible or two – maybe I should have also added some purple cabbage?  Well, too late now.  Since I’ve been focused on edibles, this was a fun variation.
Pool-2Bleft-2Bpot-2B110614AND THEN, I gave a talk on straw bale gardening to a local gardening group.  The advantage of straw bales is that they are mobile. They are also temporary and are ideal for renters who want to garden but don’t want to tear up a landlord’s yard.  Another use is if the only spot for a sunny garden is on the patio or the driveway! 
I found Joel Karsten’s book  (see my page on My Favorite Reference Books) on straw bale gardening particularly interesting, but decided to use an organic program to condition the bales rather than the one he uses. 
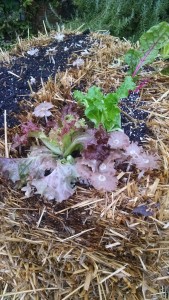
I’m on my second set of straw bales. The first ones worked really well, and by the end of the summer the tomatoes had completely covered the bales – you had to really look closely and pull tomato vines aside to see the bales.  But they required little watering and the interior was nice and composted. 
Straw-2Bbale-2Bplants-2B101014The second set I’m working on is a bit slower going because of the cooler temperatures.  I’ve used a different set of organic materials. It takes time – the plants are slow at first, but when they hit the composted interior….WOW! … they take off.  Here’s a picture of what my current set looked like on October 10.  Note the mushrooms that have appeared like stars among the transplanted greens. That means that the bales are “cooking” with microbes.